Information
Title: T2I-Adapter: Learning Adapters to Dig out More Controllable Ability for Text-to-Image Diffusion Models
Reference
Code: huggingface/diffusers
Author: Sangwoo Jo
Last updated on Oct. 03, 2023
T2I-Adapter#
Introduction#
이번 시간에는 Tencent ARC Lab 에서 소개하는 T2I-Adapter 모델에 대해 알아볼 예정입니다.
Stable Diffusion 을 비롯한 기존의 T2I 모델들이 난해한 prompt (e.g., “A car with flying wings” & “Iron Man with bunny ears”) 을 입력받을 시, 생성되는 이미지 퀄리티가 저하되는 부분을 확인할 수 있는데요. 논문에서는 T2I 모델이 low level (e.g., textures), middle level (e.g., edges), 그리고 high level (e.g., semantics) 에 대한 정보들을 implicit 하게 가지고 있지만, 이를 표현하기 위해서는 text prompt 만으로는 한계가 있고 보다 세밀한 controlling (e.g., color, structure) 이 필요하다고 서술합니다. 즉, T2I 모델의 internal knowledge 와 external guidance 의 alignment 에 대한 추가적인 학습이 필요하다고 주장합니다.
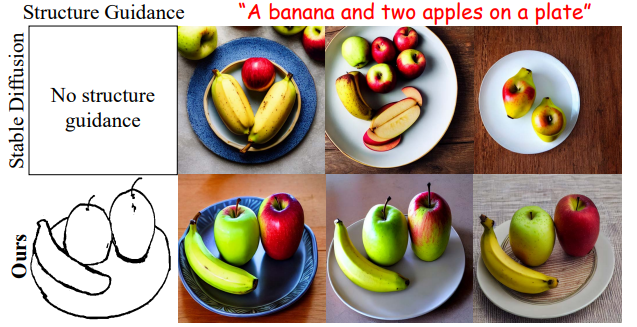
Fig. 250 Effect of External Guidance#
논문에서는 이를 해결하기 위해 T2I-Adapter 모델을 소개하고 다음과 같이 5가지 장점이 있다고 합니다.
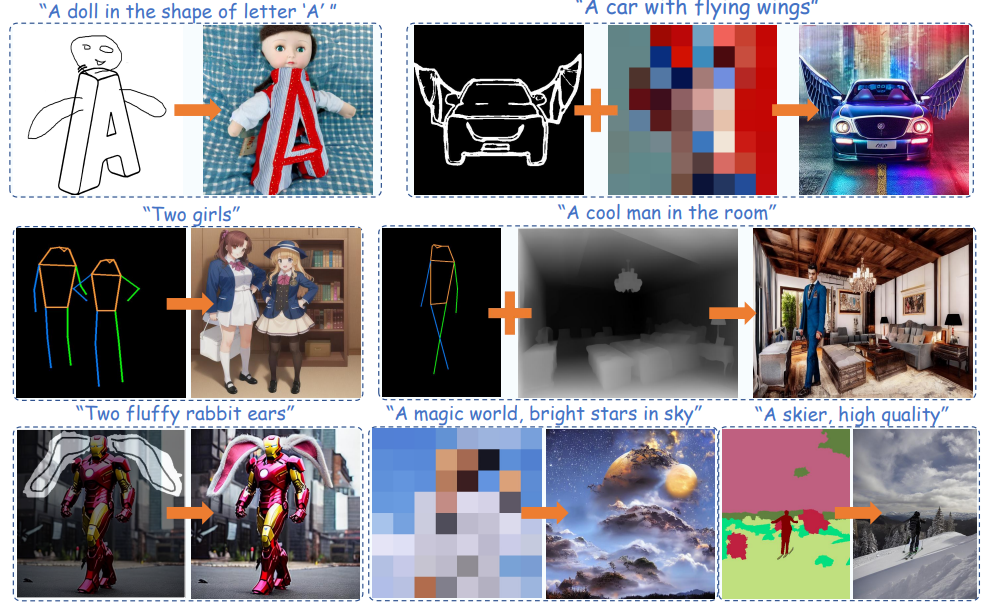
Fig. 251 Various Guidance of T2I-Adapter#
Plug-and-play : 기존의 T2I 모델의 generalization ability 유지
Simple and small : ~77M parameters and ~300M storage

Fig. 252 ControlNet vs T2I-Adapter#
ControlNet 같은 경우에 reverse diffusion process 에서 ControlNet 과 Unet 모두 연산작업이 실행됩니다. 이때 ControlNet 은 Unet Encoder 의 구조를 그대로 가져오기 때문에 parameter size 및 storage 용량이 크고, 이는 이미지 생성하는데 큰 bottleneck 이 됩니다.
Flexible : 다양한 adapter (e.g., color, structure) 학습 가능
Composable : Multiple adapter 적용 가능
Generalizable : 동일한 구조를 가진 다른 T2I 모델에 동일한 adapter 적용 가능
Method#
3.1. Preliminary: Stable Diffusion#
T2I-Adapter 의 기반이 되는 T2I 모델 Stable Diffusion 모델은 기본적으로 two-stage model 이고, autoencoder 와 Unet denoiser 로 구성되어 있습니다. Autoencoder 를 통해 이미지를 latent space 로 바꾸고 다시 복원하는 역할을 하고, Unet denoiser 는 diffusion process 를 통해 다음과 같은 손실함수를 최소화하는 방향으로 학습하게 됩니다.
\(Z_t = \sqrt{\bar{\alpha}_t}Z_0 + \sqrt{1-\bar{\alpha}_t}\epsilon, \epsilon \sim N(0,I)\) := noised feature map at step t
\(C\) := conditional information
\(\epsilon_{\theta}\) := UNet denoiser
Inference 시에는 random Gaussian distribution 을 따르는 \(Z_T\), 그리고 text prompt 를 CLIP text encoder 에 입력함으로써 생성한 token \(y\) 를 cross attention 을 통해 Unet denoiser \(\epsilon_{\theta}\) 에 입력합니다. 최종적으로, diffusion process 로부터 생성된 denoise 된 latent feature 를 decoder 를 통해 최종 이미지를 생성하게 됩니다. 자세한 cross attention 하는 방식은 다음과 같습니다.

Fig. 253 Cross Attention#
\(W_Q, W_K, W_V\) := learnable projection matrices
\(\phi(\cdot), \tau(\cdot)\) := learnable embeddings
3.2. Overview of T2I-Adapter#
논문에서는 다음과 같은 형태로 pre-trained 된 Stable Diffusion 을 비롯한 T2I 모델에 Adapter 를 추가하는 방식을 소개합니다. Adapter 의 자세한 구조는 다음과 같습니다.
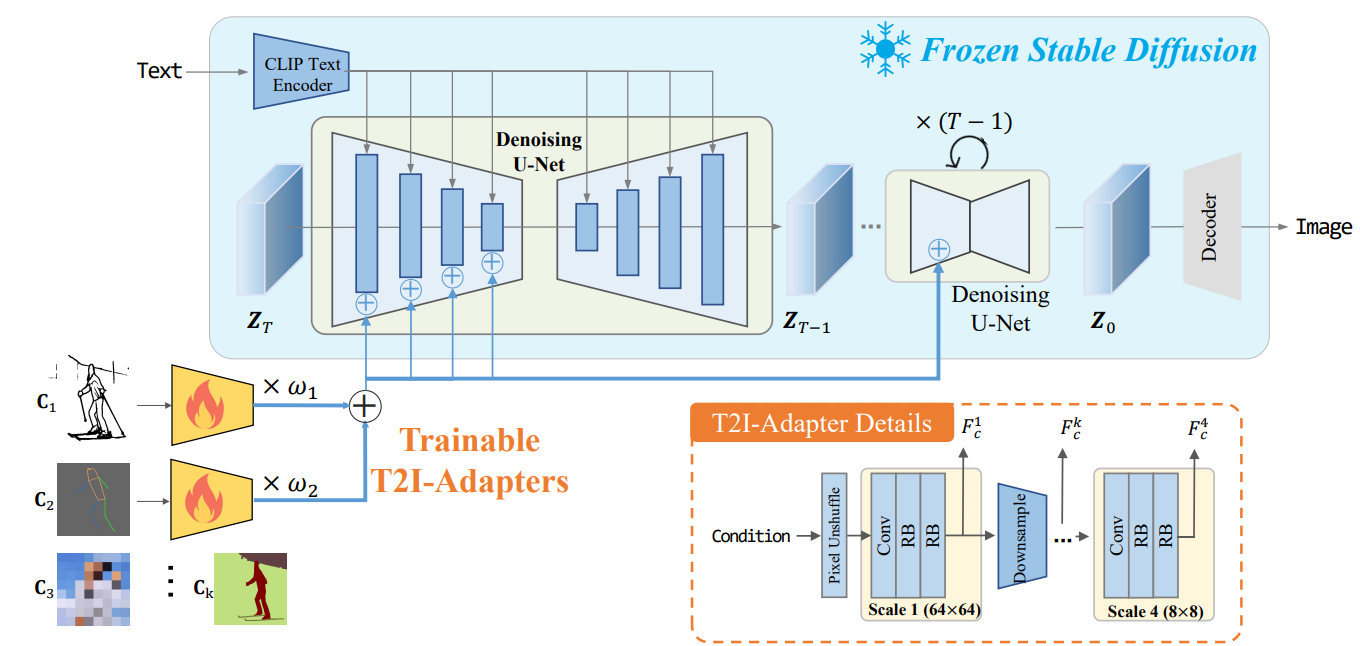
Fig. 254 Overview of T2I-Adapter#
3.3. Adapter Design#
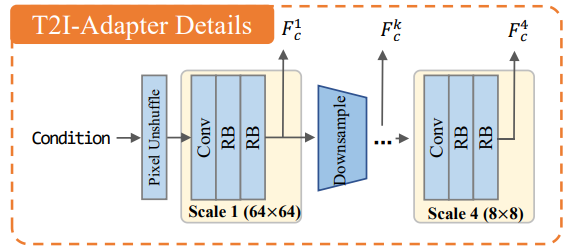
Fig. 255 Adapter Design#
Conditional input 은 512x512 의 크기를 가지며, 이는 pixel unshuffle downsampling 을 통해 64x64 이미지로 변환이 되어 1개의 convolution layer 와 2개의 residual block 으로 구성된 scale 을 4번 통과하게 됩니다. 이때, 각 scale 을 거치고 나온 condition feature 를 \(F_c^k\) 라 정의합니다.
최종적으로 multi-scale condition feature \(F_c = \{F_c^1, F_c^2, F_c^3, F_c^4\}\) 가 생성되고, 이는 Unet encoder 에서의 intermediate feature \(F_{enc} = \{F_{enc}^1, F_{enc}^2, F_{enc}^3, F_{enc}^4\}\) 와 더해지게 됩니다. 이때, dimension 크기는 동일하도록 설정했기 때문에 덧셈 연산하는데 문제 없습니다.

Fig. 256 Multi-Scale Condition Feature#
해당 implementation code 도 살펴보겠습니다.
T2I-Adapter module code
class FullAdapter(nn.Module):
    def __init__(
        self,
        in_channels: int = 3,
        channels: List[int] = [320, 640, 1280, 1280],
        num_res_blocks: int = 2,
        downscale_factor: int = 8,
    ):
        super().__init__()

        in_channels = in_channels * downscale_factor**2

        self.unshuffle = nn.PixelUnshuffle(downscale_factor)
        self.conv_in = nn.Conv2d(in_channels, channels[0], kernel_size=3, padding=1)

        self.body = nn.ModuleList(
            [
                AdapterBlock(channels[0], channels[0], num_res_blocks),
                *[
                    AdapterBlock(channels[i - 1], channels[i], num_res_blocks, down=True)
                    for i in range(1, len(channels))
                ],
            ]
        )

        self.total_downscale_factor = downscale_factor * 2 ** (len(channels) - 1)

    def forward(self, x: torch.Tensor) -> List[torch.Tensor]:
        x = self.unshuffle(x)
        x = self.conv_in(x)

        features = []

        for block in self.body:
            x = block(x)
            features.append(x)

        return features
class AdapterBlock(nn.Module):
    def __init__(self, in_channels, out_channels, num_res_blocks, down=False):
        super().__init__()

        self.downsample = None
        if down:
            self.downsample = Downsample2D(in_channels)

        self.in_conv = None
        if in_channels != out_channels:
            self.in_conv = nn.Conv2d(in_channels, out_channels, kernel_size=1)

        self.resnets = nn.Sequential(
            *[AdapterResnetBlock(out_channels) for _ in range(num_res_blocks)],
        )

    def forward(self, x):
        if self.downsample is not None:
            x = self.downsample(x)

        if self.in_conv is not None:
            x = self.in_conv(x)

        x = self.resnets(x)

        return x

class AdapterResnetBlock(nn.Module):
    def __init__(self, channels):
        super().__init__()
        self.block1 = nn.Conv2d(channels, channels, kernel_size=3, padding=1)
        self.act = nn.ReLU()
        self.block2 = nn.Conv2d(channels, channels, kernel_size=1)

    def forward(self, x):
        h = x
        h = self.block1(h)
        h = self.act(h)
        h = self.block2(h)

        return h + x
SD + T2I-Adapter implementation code
# 7. Denoising loop
adapter_state = self.adapter(adapter_input)
for k, v in enumerate(adapter_state):
    adapter_state[k] = v * adapter_conditioning_scale
if num_images_per_prompt > 1:
    for k, v in enumerate(adapter_state):
        adapter_state[k] = v.repeat(num_images_per_prompt, 1, 1, 1)
if do_classifier_free_guidance:
    for k, v in enumerate(adapter_state):
        adapter_state[k] = torch.cat([v] * 2, dim=0)

num_warmup_steps = len(timesteps) - num_inference_steps * self.scheduler.order
with self.progress_bar(total=num_inference_steps) as progress_bar:
    for i, t in enumerate(timesteps):
        # expand the latents if we are doing classifier free guidance
        latent_model_input = torch.cat([latents] * 2) if do_classifier_free_guidance else latents
        latent_model_input = self.scheduler.scale_model_input(latent_model_input, t)

        # predict the noise residual
        noise_pred = self.unet(
            latent_model_input,
            t,
            encoder_hidden_states=prompt_embeds,
            cross_attention_kwargs=cross_attention_kwargs,
            down_block_additional_residuals=[state.clone() for state in adapter_state],
        ).sample

        # perform guidance
        if do_classifier_free_guidance:
            noise_pred_uncond, noise_pred_text = noise_pred.chunk(2)
            noise_pred = noise_pred_uncond + guidance_scale * (noise_pred_text - noise_pred_uncond)

        # compute the previous noisy sample x_t -> x_t-1
        latents = self.scheduler.step(noise_pred, t, latents, **extra_step_kwargs).prev_sample
Adapter 종류로는 크게 structure 에 대한 conditioning 과 color 에 대한 conditioning 으로 분류할 수 있습니다. Structure controlling 으로는 대표적으로 sketch, depth map, semantic segmentation map, keypose 등이 있습니다. Color map 은 이미지를 우선적으로 high bicubic downsampling 을 통해 semantic 및 structural 한 정보를 제외시키고, nearest upsampling 기법으로 다시 원본 이미지 크기로 복원하는 작업을 통해 생성합니다.
앞써 설명한 부분처럼 추가 학습 없이 여러 adapter 로 conditioning 할 수도 있습니다. Multi-adapter 로 controlling 할 시, 다음과 같이 각 adapter 로부터 나온 condition feature 에 weight \(w_k\) 를 부여해 최종 condition feature 를 정의하게 됩니다.

Fig. 257 Multi-Adapter Conditioning#
3.4. Model Optimization#
모델 학습 시, SD 파라미터는 고정시킨 상태로 T2I-Adapter 파라미터만 학습합니다. 이때, T2-Adapter 손실함수는 SD 학습 시와 유사하게 다음과 같이 정의합니다.
where \(t \sim U(0,T)\)
Non-uniform time step sampling during training
Diffusion 모델 학습 시와 동일하게, time embedding 을 adapter 에 input 으로 넣으면서 성능 개선 효과가 있는 것을 확인했지만 매 time step \(t\) 마다 \(F_c\) 를 conditioning 하는 것은 computationally expensive 합니다.
따라서, 논문에서는 DDIM inference sampling 을 크게 3가지 stage (i.e., beginning, middle, late stage) 로 분류하는 방법을 소개합니다. 실험해본 결과, middle 그리고 late stage 에 적용하는 것보다 beginning stage 에서 guidance 를 주는 효과가 더 크다고 합니다.

Fig. 258 DDIM Inference Sampling Stages#
따라서, 최대한 time step \(t\) 가 early sampling stage 에 포함되도록 다음 수식처럼 non-uniformly 하게 sampling 작업을 진행했고, 이에 대한 결과도 공유합니다.
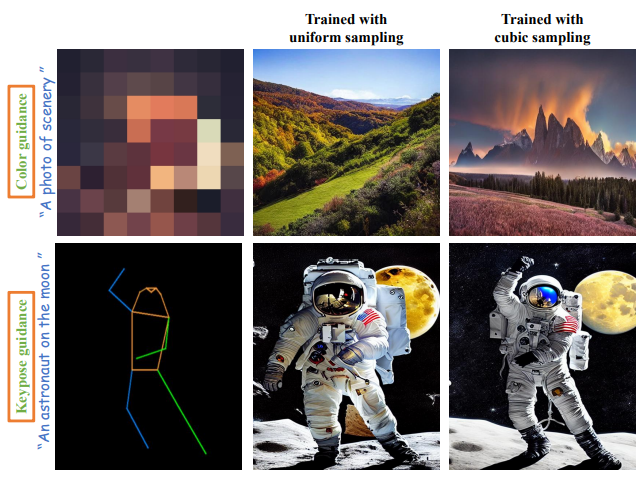
Fig. 259 Effect of Cubic Sampling#
Experiment#
4.1. Implementation Details#
T2I-Adapter 학습 시, hyperparameter 및 데이터셋 구축 상세사항은 다음과 같습니다.
Hyperparameters
10 epochs
Batch size = 8
Learning rate = \(1 \times 10^{-5}\)
Adam optimizer
4X NVIDIA Tesla 32G-V100 GPUs (3 days)
실험별 데이터셋 구축
Sketch Map
COCO17 데이터셋 - 164K images
PiDiNet 를 활용해 sketch map 생성
Semantic segmentation map
COCO-Stuff 데이터셋 - 164K images
Keypoints & Color & Depth maps
LAION-AESTHETICS 데이터셋로부터 600K images-text pairs 추출
MM-Pose, MiDaS 모델로 각각 Keypoint, Depth map 생성
4.2. Comparison#
기존 SOTA 모델들과 정량적인 수치로 비교하는데 FID 와 CLIP Score 를 사용하였고, 하단 사진처럼 기존 GAN-based 그리고 diffusion-based method 모델들보다 성능이 좋습니다.
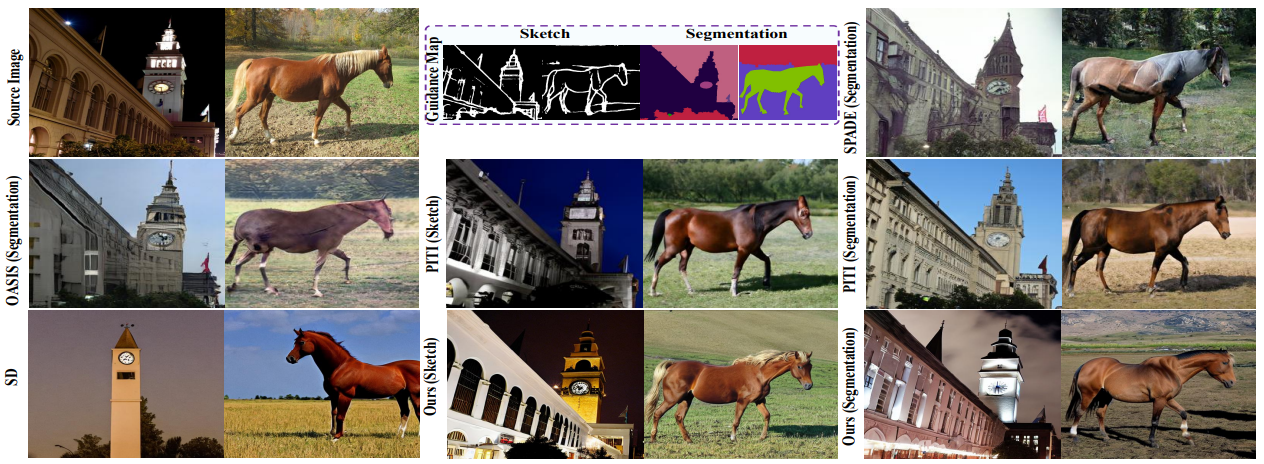
Fig. 260 Qualitative Comparison#

Fig. 261 Quantitative Comparisoin#
4.3. Applications#
해당 예시들은 다양한 single adapter controlling 에 대한 결과들을 보여줍니다. 특히 인상적인 부분은 sketch 로 controlling 시, sketch 가 정확하지 않아도 이미지 생성에 robust 한 성능을 보여주는 것을 확인할 수 있습니다.
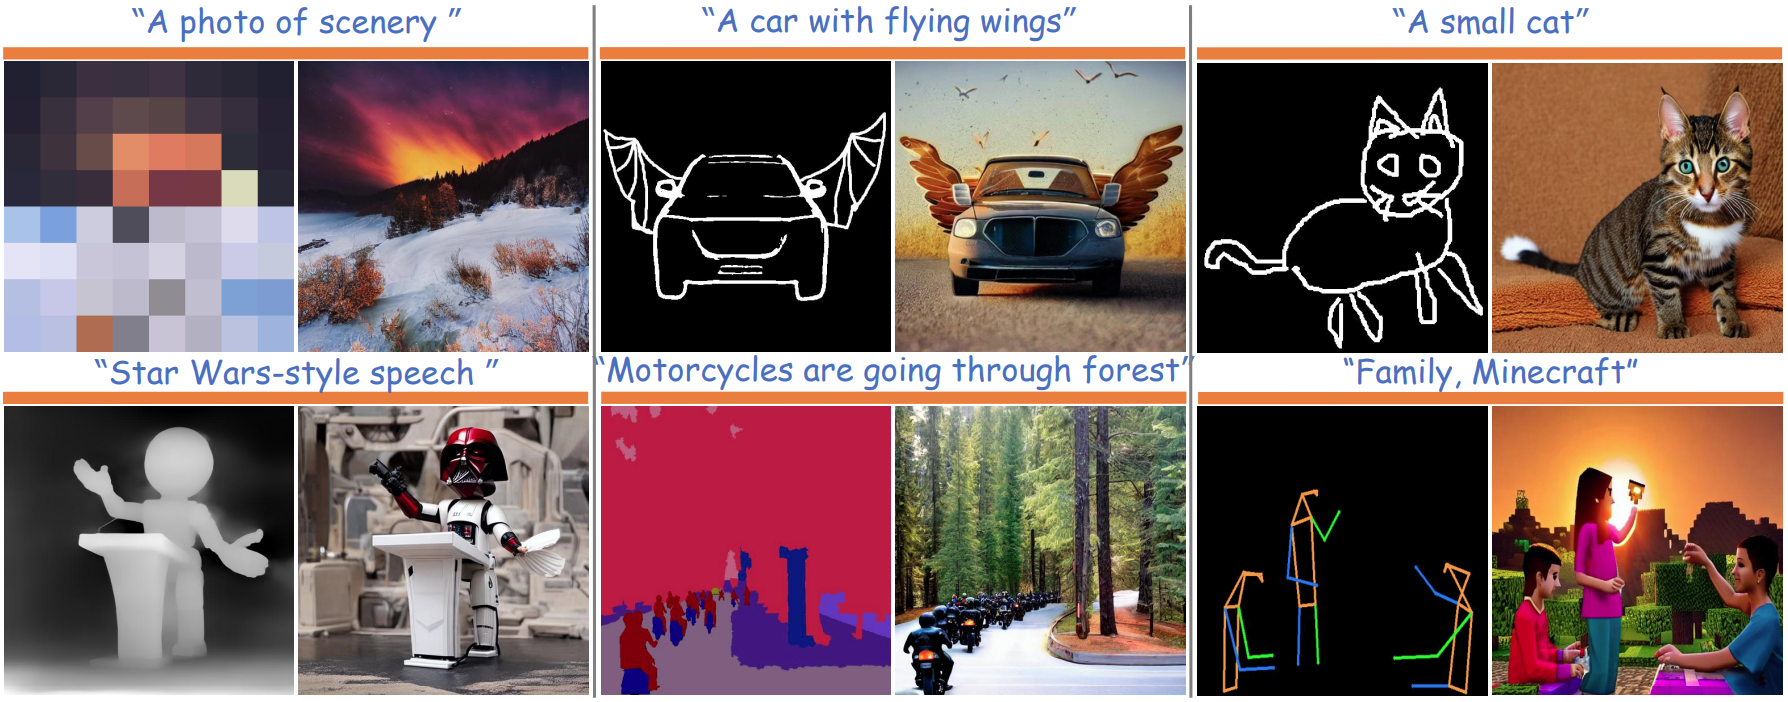
Fig. 262 Visualization of Single-Adapter Controlling#
또한, image editing 도 가능합니다. SD inpainting mode 로 특정 지역을 masking 한 후, T2I-Adapter 를 통해 image editing 을 한 예시 사진입니다. Adapter 없이, SD inpainting 만으로는 성능이 좋지 못하다고 합니다.
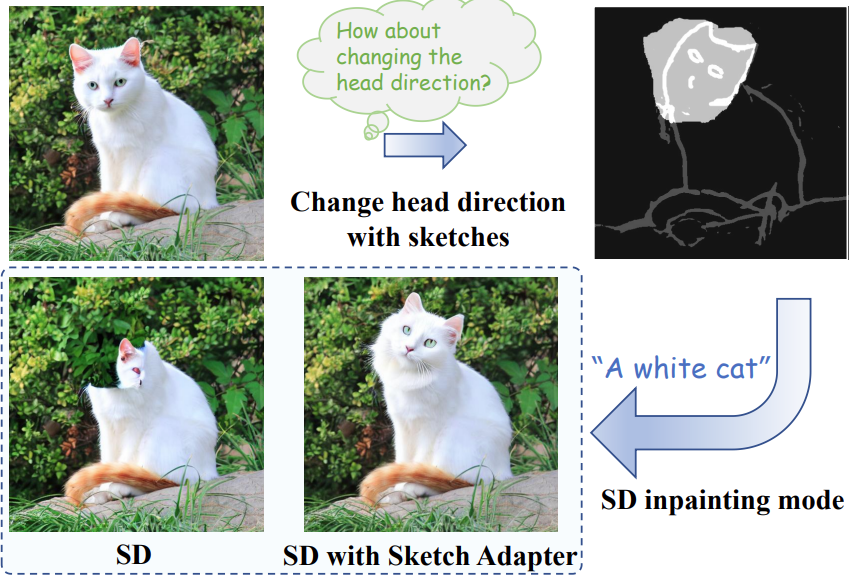
Fig. 263 Image Editing with T2I-Adapter#
아래 예시는 multiple adapter 를 적용한 것로 위에서부터 아래로 각각 depth + keypose 그리고 sketch + color map 을 conditioning 한 결과입니다.
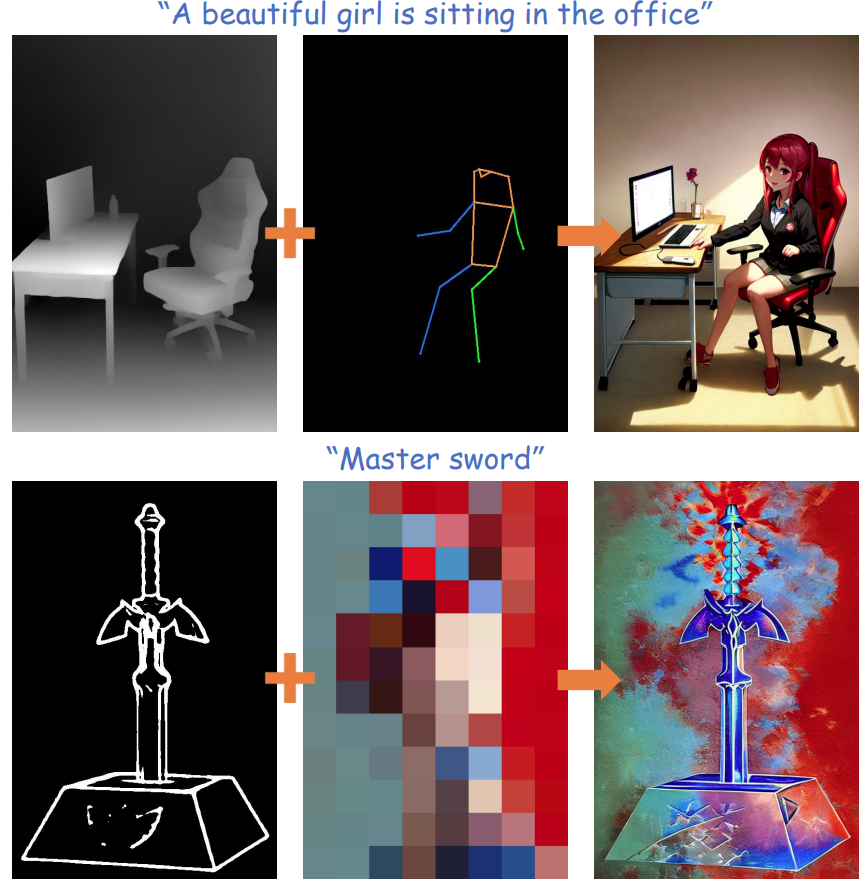
Fig. 264 Composable Controlling#
마지막으로, 장점들 중 하나로 명시되었던 generalization ability 를 보여준 사례입니다. 학습 완료한 Adapter 를 동일한 구조를 가진 T2I 모델에 적용 가능한 것을 확인할 수 있습니다.
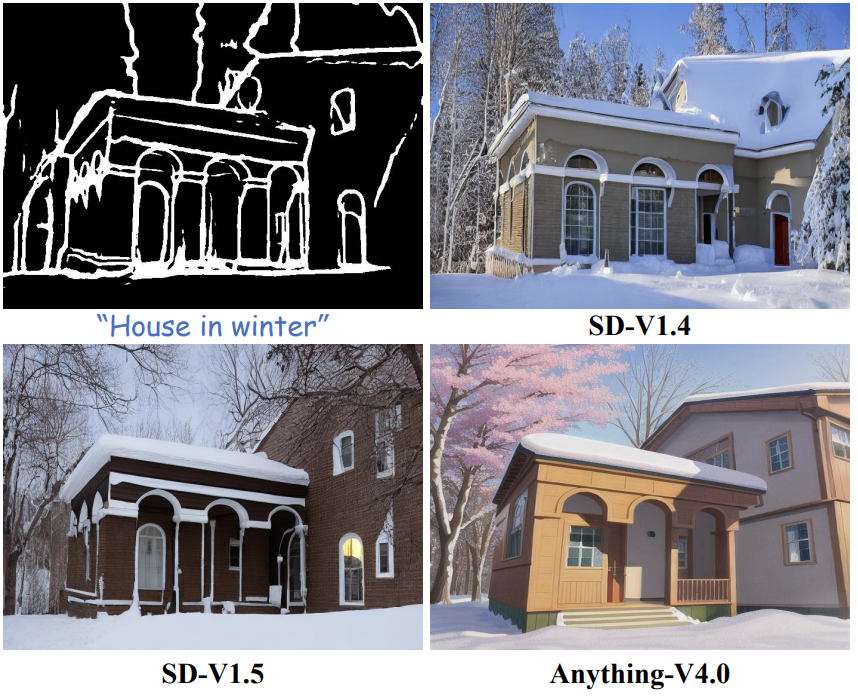
Fig. 265 Generalizable Controlling#
4.4. Ablation Study#
논문에서는 guidance mode, 그리고 complexity 에 대한 ablation study 를 진행했습니다.
SD 모델은 encoder 그리고 decoder 에 각각 4개의 scale (i.e., 64×64, 32×32, 16×16, 8×8) 을 가지고 있는데, 하단 table 처럼 각각 다른 scale 에 adapter guidance 를 적용하면서 FID 성능을 비교했습니다. Scale Number 가 4보다 작을 경우, large scale 에 순차적으로 guidance 를 적용했습니다. 그 결과, Unet encoder 에만 4 scales 모두 guidance 를 적용하는 것이 성능이 제일 좋다고 합니다.
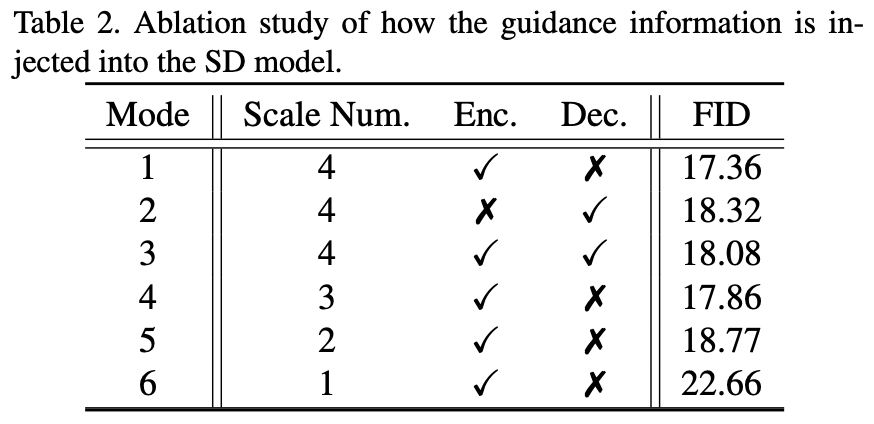
Fig. 266 Guidance Mode#
또한, condition map 는 비교적 sparse 하기 때문에 더 경량화된 adapter 를 사용해도 성능이 좋은 부분을 하단 예시처럼 확인할 수 있었다고 합니다. 더 자세하게는, adapter block 의 intermediate channel 숫자를 바꿔가며 adapter-small, adapter-tiny 모델을 각각 x4, x8 compression 작업을 진행했습니다.
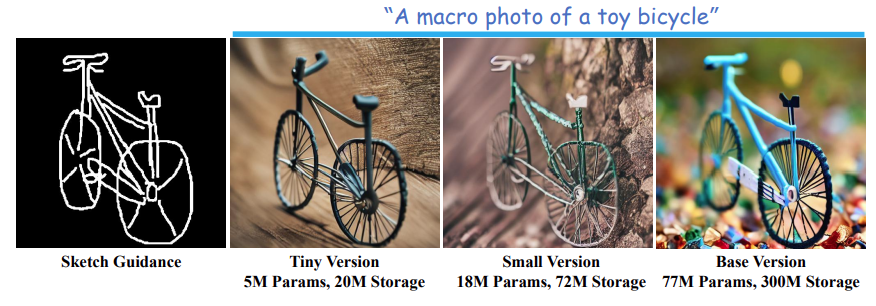
Fig. 267 Complexity Ablation#
