Information
Title: DreamGaussian: Generative Gaussian Splatting for Efficient 3D Content Creation (ICLR 2024)
Reference
Project Page: https://dreamgaussian.github.io/
Author: Kyeongmin Yu
Last updated on Dec. 26, 2024
DreamGaussian#
1. Abstract#
2. Related Work#
2.1 3D representations#
Neural Radiance Fields (NeRF)
| original NeRF | NeRF와 Mip-NeRF의 차이점 | Mip-NeRF 360의 contract($\cdot$) function |
|---|---|---|

|

|

|
| 신경망(MLP)을 이용해 3d 물체에 대한 정보를 표현했다. 신경망은 카메라의 위치와 방향을 입력으로 해당 지점의 density와 color를 리턴한다. 온전한 하나의 이미지를 렌더링 하기 위해서는 모든 camera ray를 따라 (이론상)적분이 필요하다. | ray tracing이 아닌 cone tracing 방식으로, 렌더링 된 이미지의 품질을 향상시킴. | 파란 영역은 euclidean space, 노란 영역은 맵핑된 영역이다. 이외에도 기존 방식(coarse-to-fine)과 다르게 n개의 신경망을 사용했으며 초기 신경망을 최종 결과물 출력시 사용하지 않았다. |
| Instant NGP | Block-NeRF | NeRF in the wild |
|---|---|---|

|

|

|
| voxel기반의 multiresolution hash encoding을 통해 기존 sin/cos을 이용한 positional encoding 방식을 발전시킴. 이러한 encoding 방식을 채택함으로써 encoding 자체의 속도도 빨라졌으며 다중 스케일 정보를 담은 encoding을 이용함으로써 original NeRF의 신경망보다 오히려 작은 구조를 채택할 수 있었다. 또한 cuda를 활용하여 처리속도를 향상시킴으로써 real-time에 가까운 속도를 낼 수 있었다. | 대규모 장면을 모델링하기 위해 여러 NeRF를 합쳐서 하나의 큰 장면을 구성하는 방법 | in the wild dataset에서 scene 재구성을 위해 scene을 "static 요소"와 "transient 요소"로 분리하여 모델링 |
3D Gaussian Splatting (3DGS)
| point cloud 예시 | Gaussian densification 과정 |
|---|---|

|

|
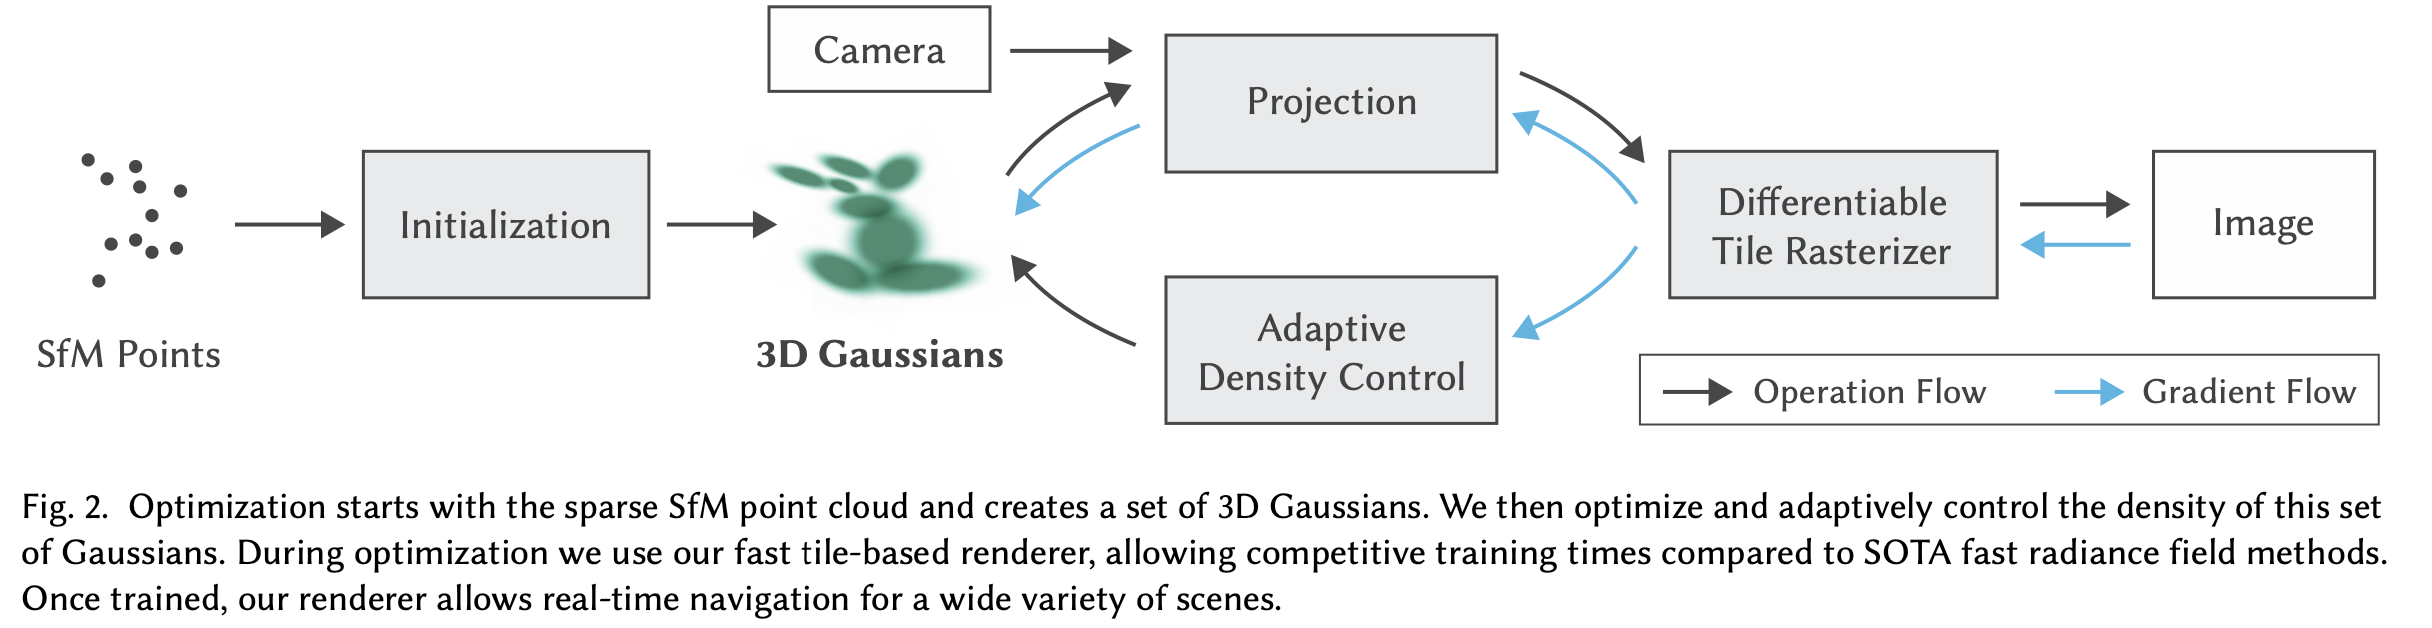
Fig. 776 Gaussian Splatting optimization colmap과 같은 SfM 을 이용해 3D keypoint를 찾아 해당 지점으로 3D gaussian을 초기화 한다. 이후 gaussian들을 합치거나 쪼개며 최적화를 진행한다. 렌더링 시에는 3D gaussian들을 2D projection하여 하나의 이미지를 만든다.#
3D Gaussian representation [참고1][참고2]
각각의 3D Gaussians은 3D position(mean) \(\mu\), opacity \(\alpha\), anisotropic covariance \(\Sigma\)로 위치와 크기, 방향을 표현하며, 여기에 spherical harmonic (SH) coefficients를 추가해 view-dependent appearance(color)를 표현했다.
covariance matrix \(\Sigma\) 를 rotation matrix \(\mathbf R\) 와 scaling matrix \(\mathbf S\)로 분리가능.
rotation matrix는 (real \(r\)+ imaginery \(i,j,k\)) 4차원의 quaternion으로 표현가능.
scaling matrix는 (\(x,y,z\)) 3차원의 scale로 표현가능.
SH 계수의 경우 일반적으로 각 색상 채널(R, G, B)당 9개의 계수, 총 27개의 계수를 사용합니다.
9개의 계수를 사용한다는 말은 \(l\in[0,1,2]\) 라는 뜻이며, \(m \in [-l,+l]\) 이다.
SH를 이용하면 빛이 균일하게 퍼지는 표면(매트한 표면)외에도 입사각(보는 방향)에 따라 달라지는 Non-Lambertian effects도 표현할 수 있다.
Spherical Harmonics \(Y_l^m(\theta,\phi)\) 를 이용한 lighting [paper]
Spherical Harmonics는 번역하면 구면조화함수로 구의 표면에서 정의되는 함수를 말한다. 구면좌표계 \((r,\theta,\phi)\) 에서 \(r\) 을 고정하고 \(\theta, \phi\)에 따라 값을 출력하는 함수이다.

Fig. 777 수학적으로는 라플라스 미분방정식의 해#
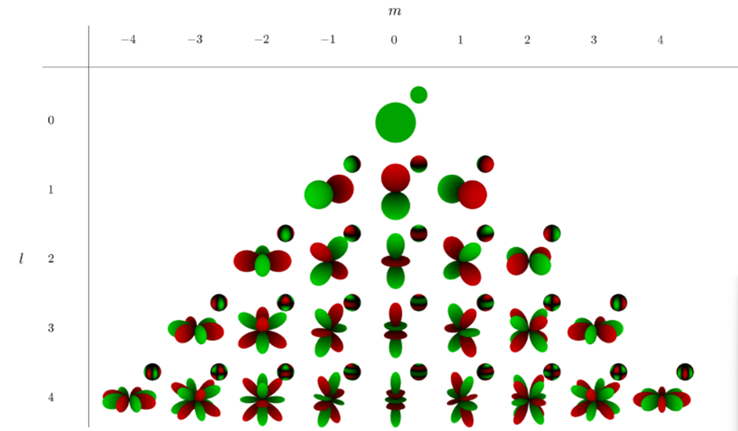
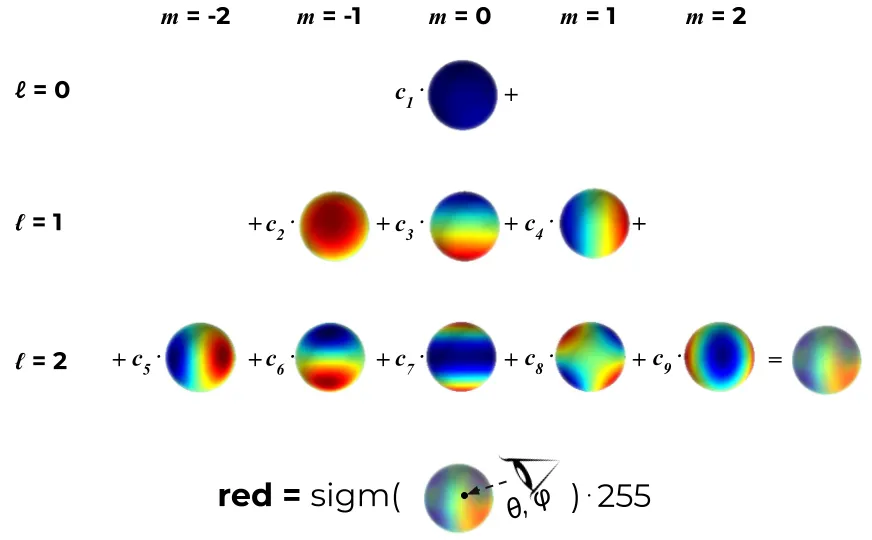
Fig. 779 Spherical Harmonics 시각화#

cf. fourier series
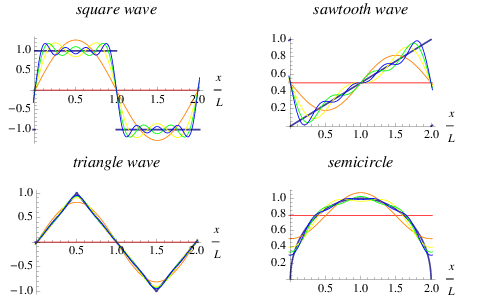
Fig. 780 삼각함수들을 이용해 임의의 주기함수를 근사하는 푸리에 변환의 3D 확장판#
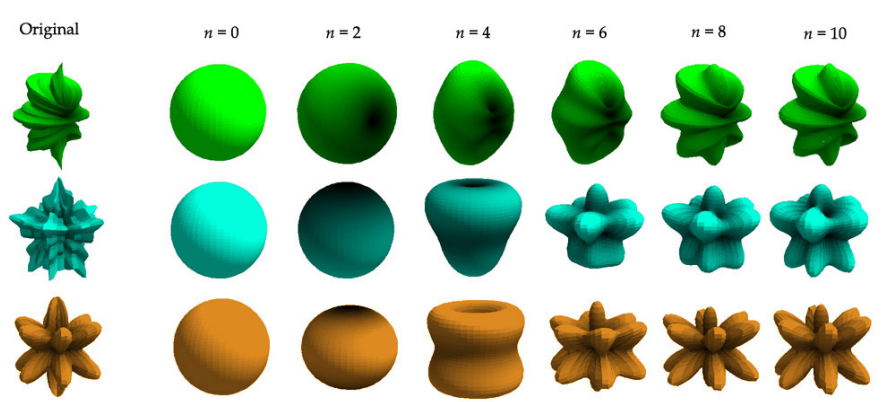
Fig. 781 SH를 이용한 근사 예시. SH는 구 표면에서의 분포의 basis에 해당.#
Lambertian vs. Non-lambertian
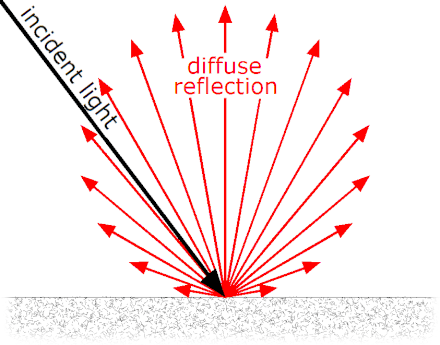
Fig. 782 Diffuse reflection (~ Lambertian effects)#
Lambertian reflection은 어떤 각도에서 보든 같은 양 빛을 관찰 할 수 있는 이상적인 상태
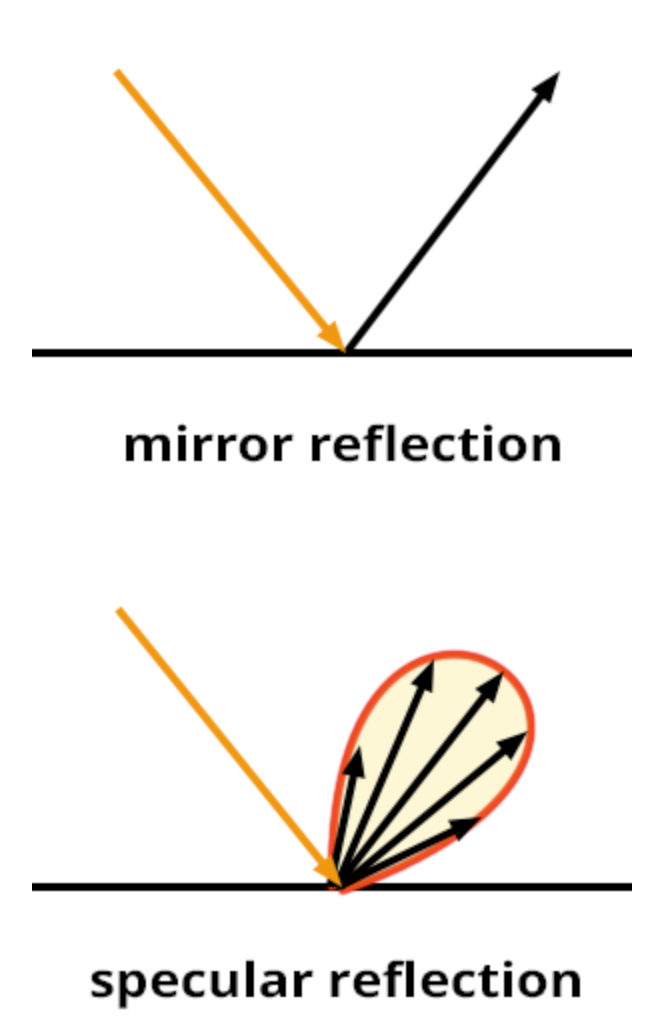
Fig. 783 Non-lambertian effects -> 즉, 반사광 표현가능#
Pruning and Densification
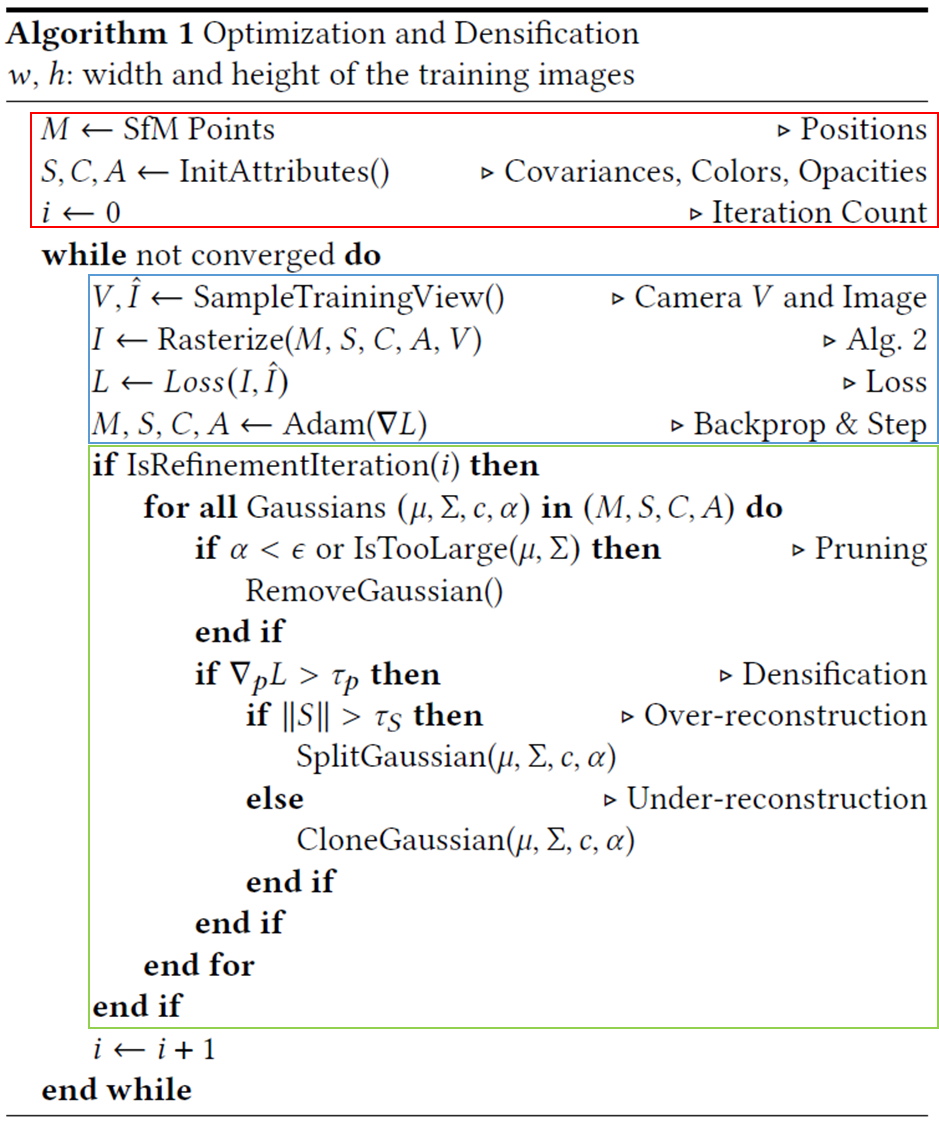
Fig. 784 3D Gaussian Splatting initialization, optimization, adaptive control of gaussians#
Volumetric Rendering
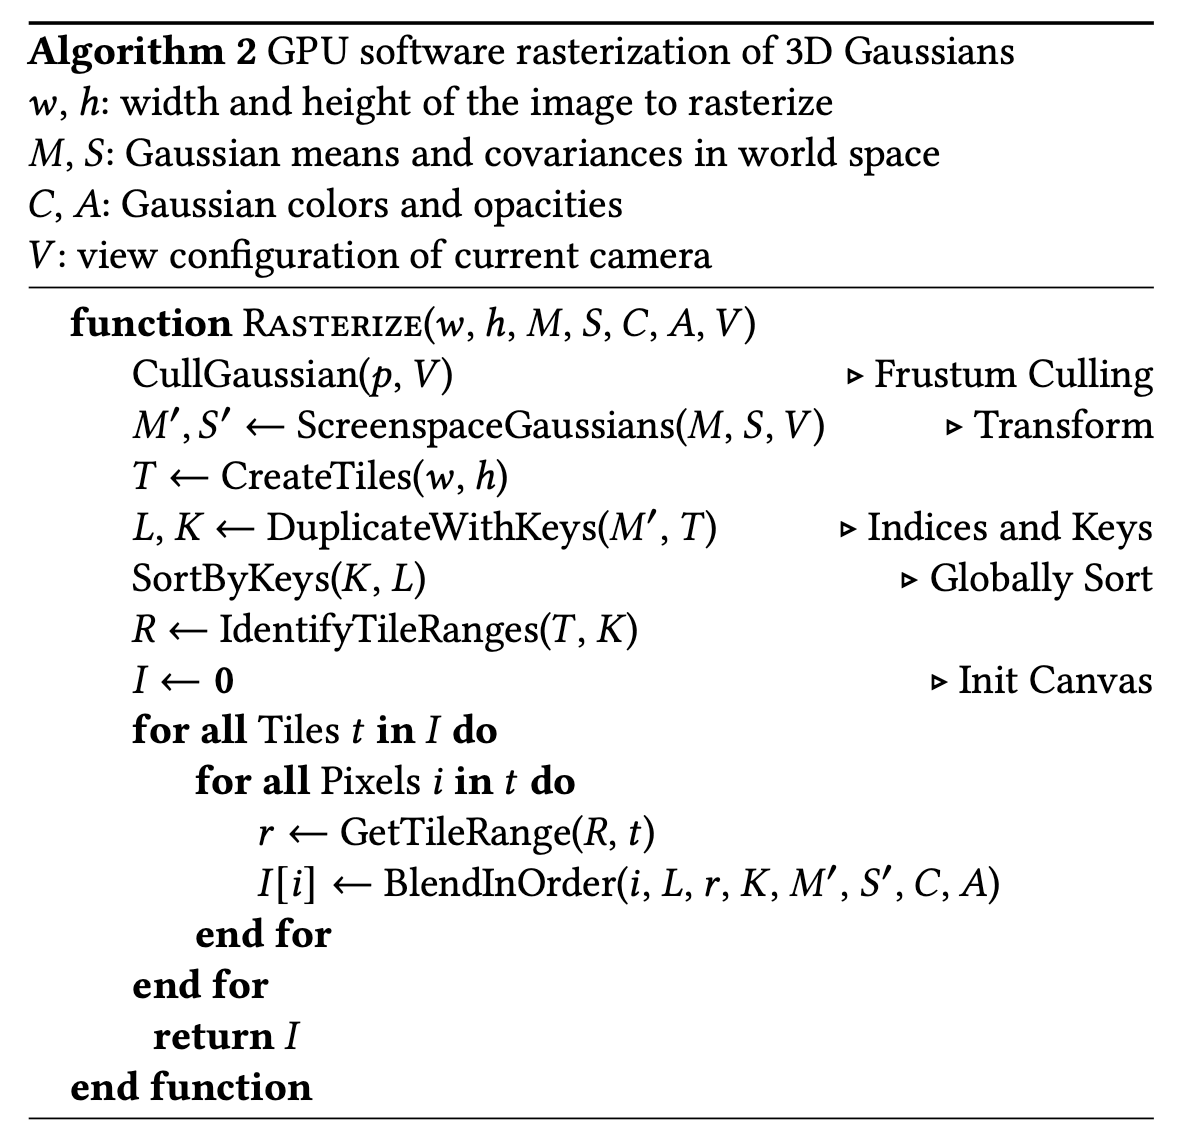
Fig. 785 3D Gaussian Splatting Volumetric Rendering#
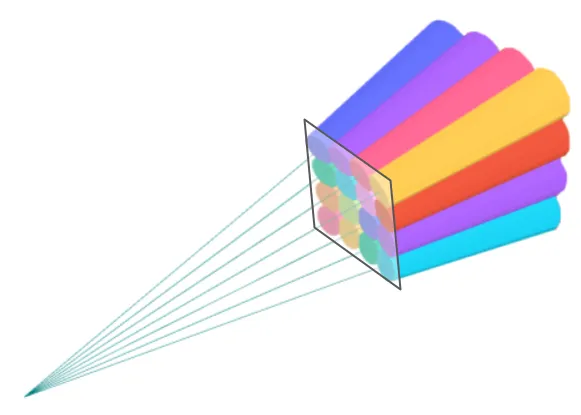
Fig. 786 from nerfstudio#
frustrum culling을 통해 보이지 않는 3D gaussian들을 제외하고 2D로 projection.
3D gaussian들을 sorting하고 각 픽셀의 ray에 겹치는 3D gaussian들만 color, opacity 값을 반영한다.
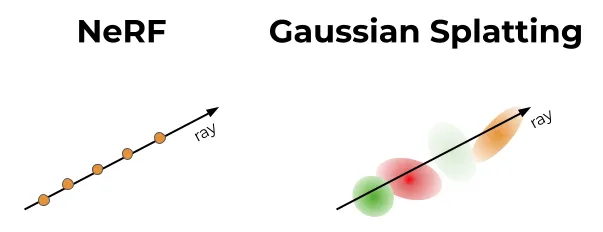
Fig. 787 original NeRF vs 3d Gaussian Splatting rendering#
2.2 Text-to-3D Generation#
data-driven 3D diffusion models
3D native diffusion models
lift 2D image models for 3D generation
2.3 Image-to-3D Generation#
generating 3D assets form a reference image(~ single-view 3D reconstruction)
text-to-3D methods can also be image-to-3D methods
Zero-1-to-3
One-2-3-45
2.4 추가 참고자료#
DreamFusion
Score Distillation Sampling (SDS) [arXiv]
pretrained 2D diffusion model을 parametric image generator로서 사용하는 방식을 제안함. image generator로서 NeRF를 사용하여 differentiable 3D representation을 가능하도록 함.
\[ \mathbf x=g_\Theta(p) \]\(\mathbf x\) 는 카메라 포즈 \(p\)에서 렌더링된 이미지를 의미한다. \(g_\Theta(\cdot)\)는 differentiable rendering function으로 NeRF parameters \(\Theta\)를 paramter로 갖는다.
\[ \triangledown_\Theta\mathcal L_\text{SDS}=\Bbb E_{t,p,\epsilon}\Big[w(t)(\epsilon_\phi(\mathbf x;t,e)-\epsilon)\frac{\partial\mathbf x}{\partial\Theta} \Big] \]\(w(t)=\sigma_t^2\) 는 DDPM의 weighting function, \(\epsilon_\phi(\cdot)\)은 pretrained parameter \(\phi\)로 noise를 예측하는 함수이다.
즉, SDS formulation은 사전학습된 2D 이미지 생성 디퓨전 모델을 이용해 NeRF parameter \(\Theta\)를 최적화하는 식이다. 이를 통해 text description에 맞는 NeRF 3D shape을 최적화 할 수 있는 것이다.
Marching Cube
- 3d 모델에서 표면(mesh)을 추출하기 위한 알고리즘. 여기서 표면은 밀도가 특정 값을 넘는 지점을 의미한다.주어진 3D 공간을 작은 큐브(cube/voxel)로 나누고, 각 큐브의 8개 코너에서 값(일반적으로 밀도값)을 보고 그 값을 바탕으로 표면을 추출한다.
8개의 코너의 밀도값에 따라 어떤 표면을 가지게 되는지는 미리 정해둔 정보(\(2^8\))를 이용한다.
3D 공간을 작은 큐브로 분할
임계값을 기준으로 판단
해당 지점이 물체 내부에 속하는지 외부에 속하는지 판단함
표면 생성
각 큐브의 꼭짓점 값에 따라 표면이 어떻게 생길지에 대한 규칙을 미리 정의해두고, 이를 바탕으로 표면을 추출
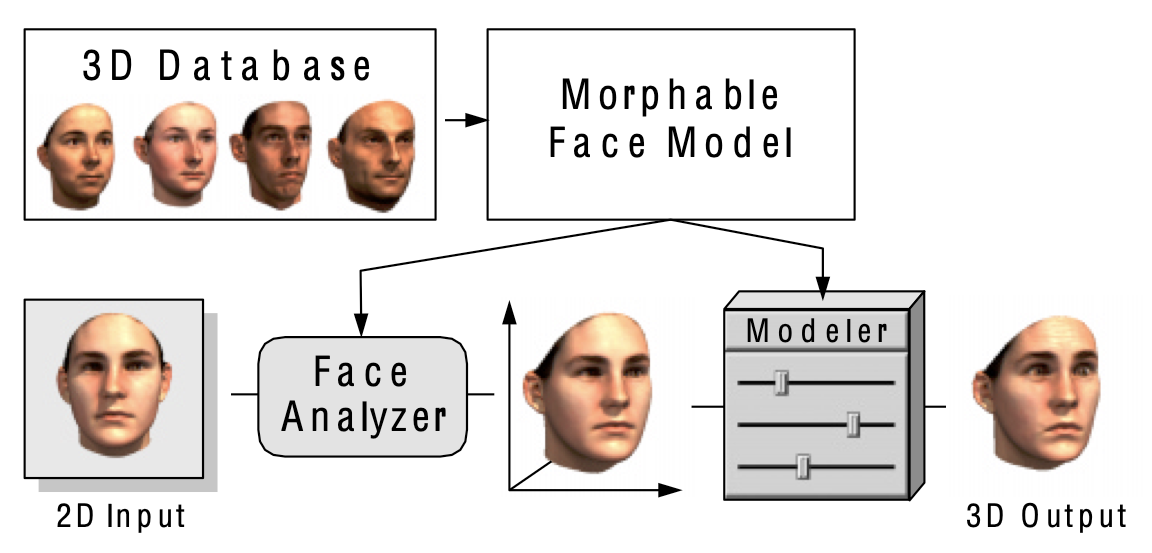
Fig. 788 from wikipedia#
오렌지 점들은 물체의 표면 혹은 가장자리에 위치한 점들을 의미함.
NVDiffrast
nvidia 2020 ACMTOG [arXiv][github]
미분가능한 렌더링 방법론으로 cuda를 이용해 가속화한 것이 특징.
주로 삼각형 메시를 효율적으로 렌더링하고 그래디언트를 계산하기 위해 사용됨.
FLAME, 3DMM, SMPL등은 미분가능한 3D 모델으로 렌더링 방법론은 아님.
3DMM (3D Morphable Models) 1999
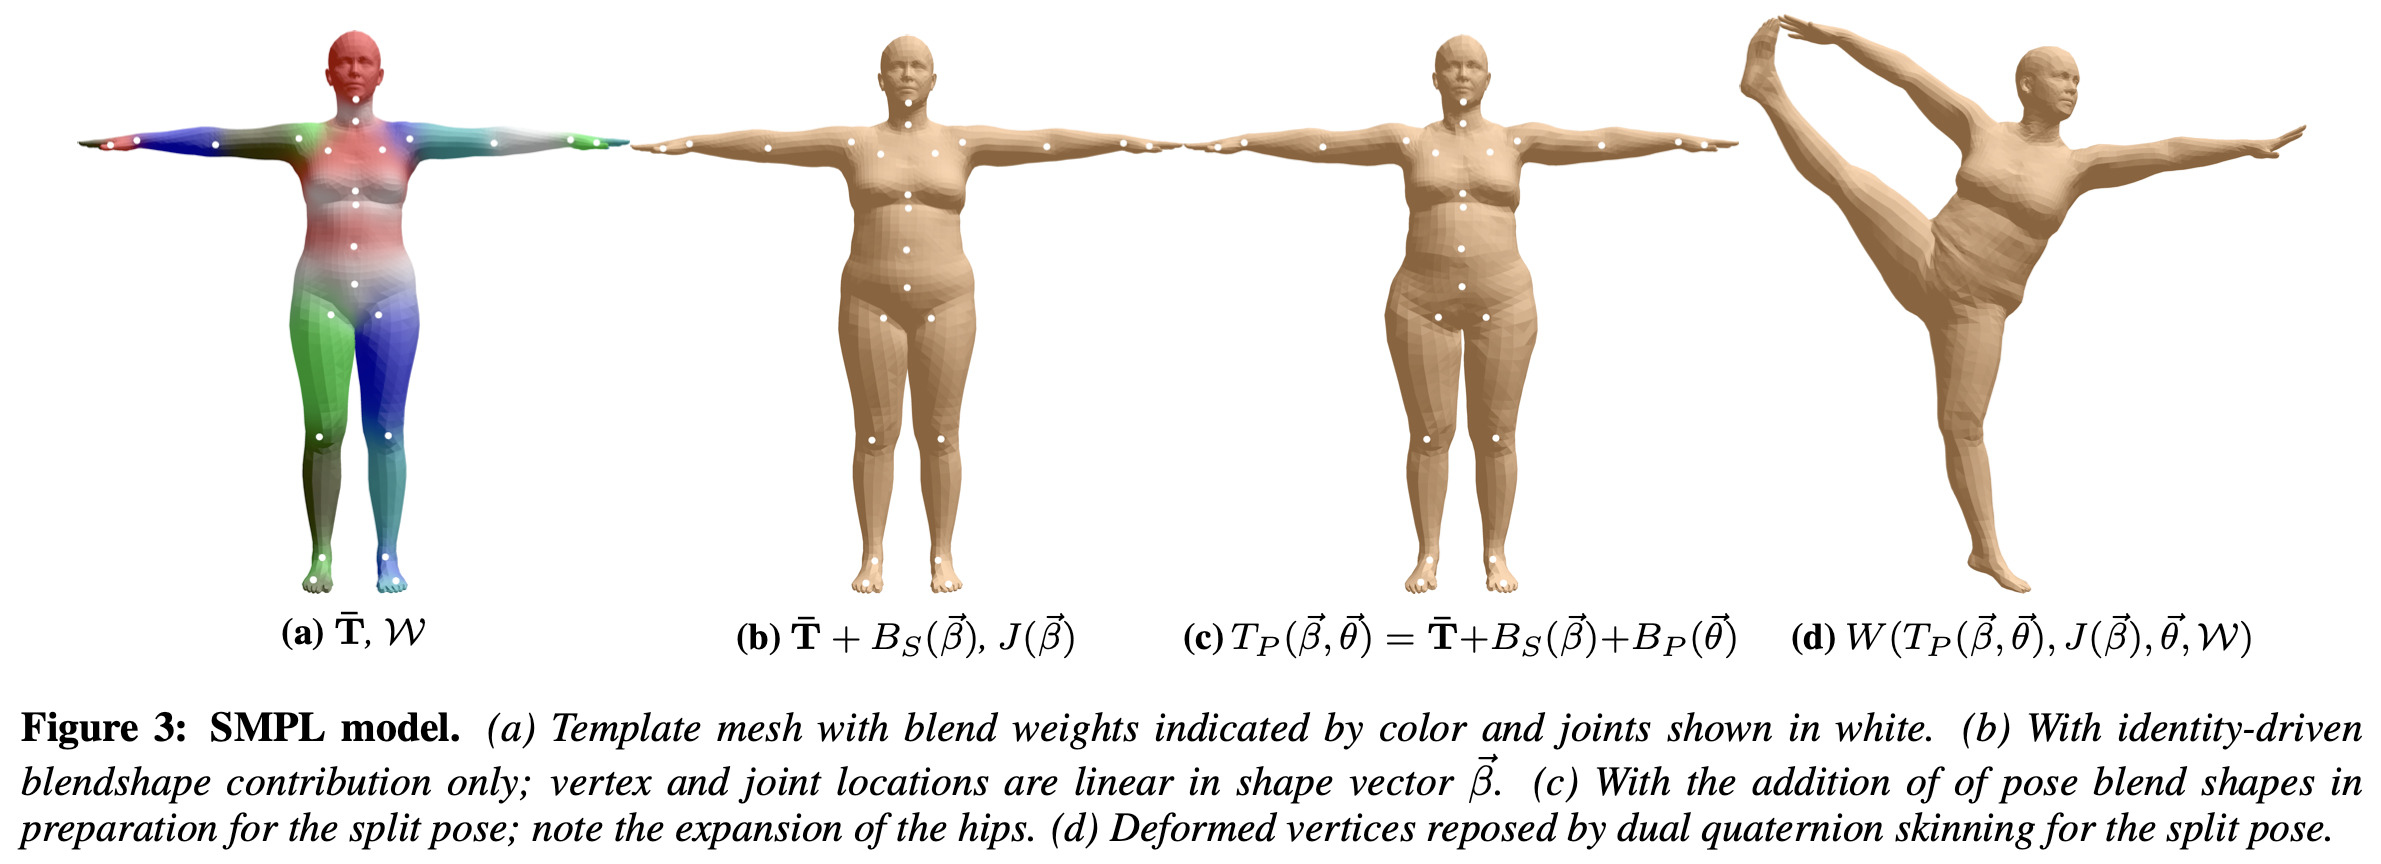
Fig. 789 3DMM#
SMPL (Skinned Multi-Person Linear Model) 2015

Fig. 790 SMPL#
FLAME (Faces Learned with an Articulated Model and Expressions) 2017
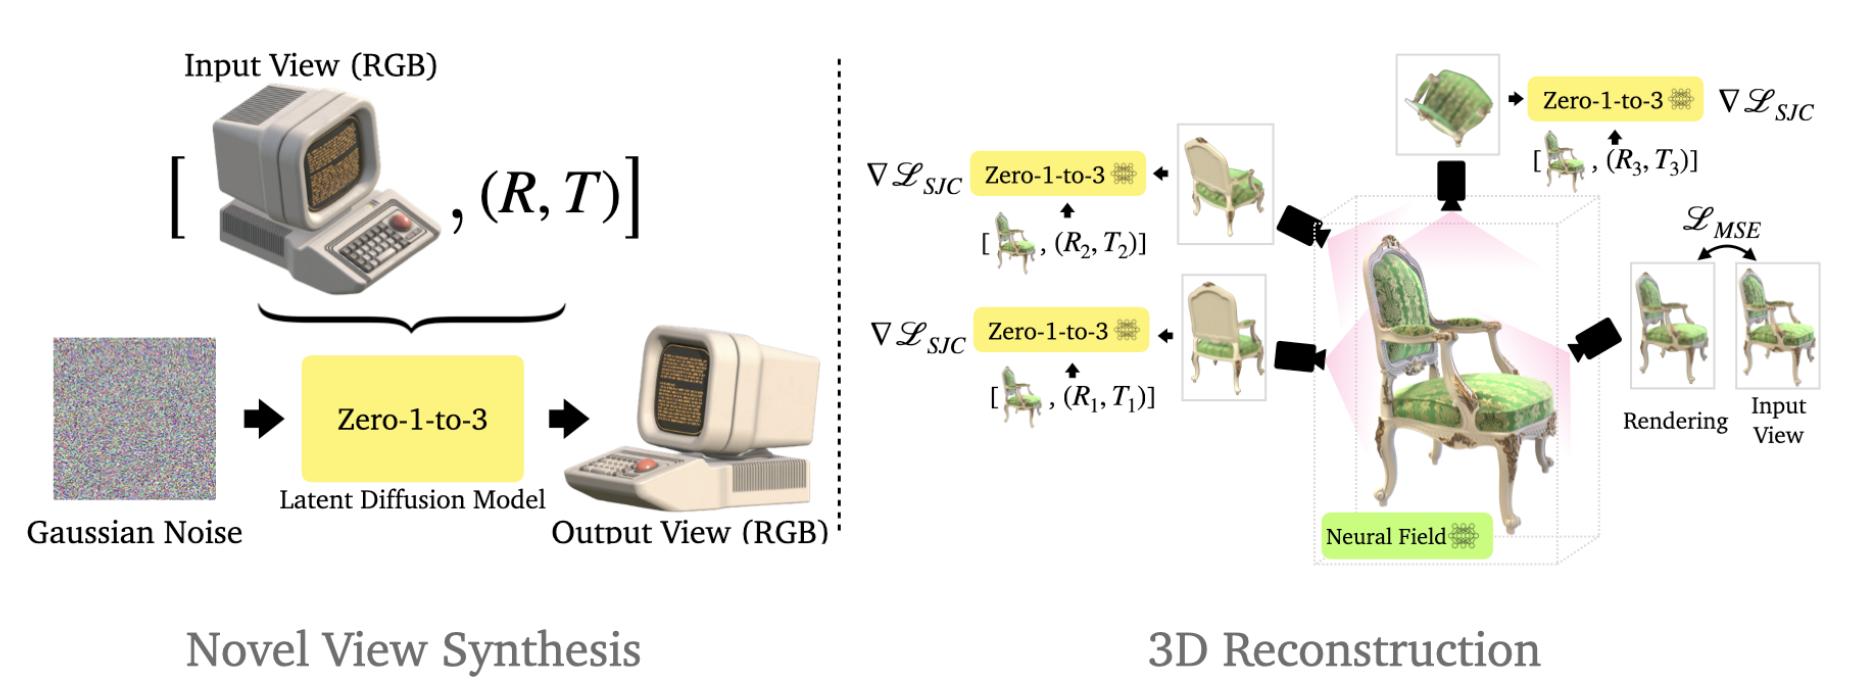
Fig. 791 FLAME#
Zero-1-to-3
[project page] [DDPM (NeurIPS 2020)]
Zero-1-to-3 control the camera perspective in large-scale diffusion models, enabling zero-shot novel view synthesis and 3D reconstruction from a single image.
RGB image \(x\in\Bbb R^{H\times W\times 3}\) , relative camera rotation \(R\in \Bbb R^{3\times 3}\),relative camera translation \(T\in\Bbb R^3\)
Fig. 792 zero 1-to-3#

Fig. 793 zero 1-to-3#
3. Method#
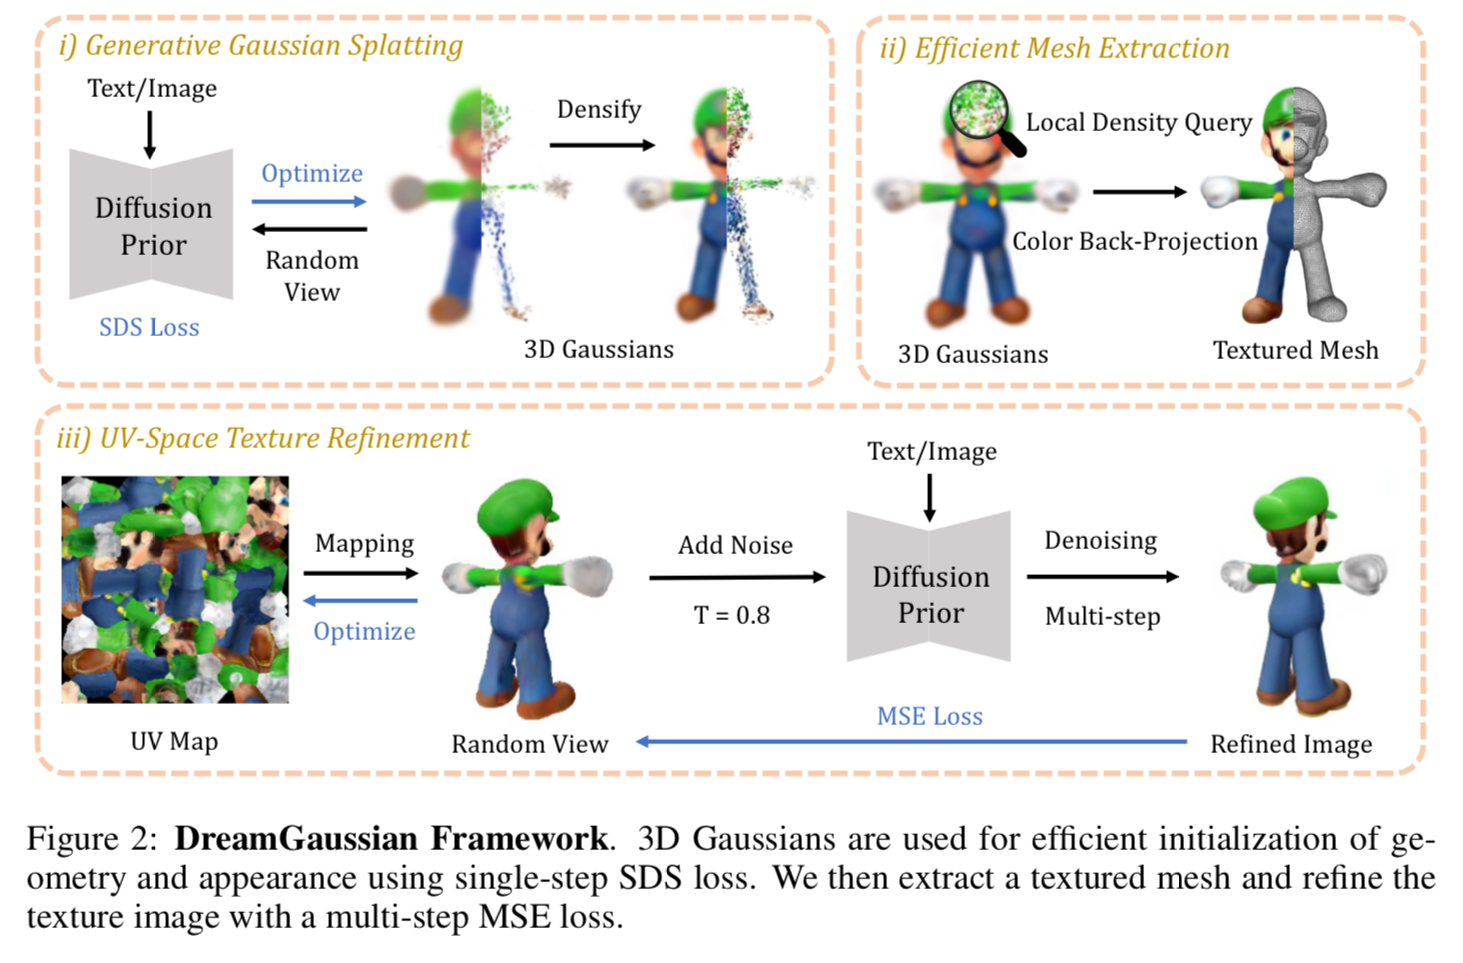
Fig. 794 Method Overview#
2-stage framework for 3D content generation for both Image-to-3D and Text-to-3D tasks.
SDS를 이용해 초기화 한 3D gaussian splatting을 이용하여 3D generation
3D gaussians에서 textured mesh 추출
UV-space refinement를 통해 texture fine-tuning
3.1 Generative Gaussian Splatting#
개별 3D gaussian의 위치와 형태는 center(\(\mathbf x\)), scaling factor(\(\mathbf x\)), rotation quaternion(\(\mathbf q\))으로 표현되며, opacity value(\(\alpha\)), color feature(\(\mathbf c\))를 저장하여 volumetric rendering시 사용한다.
\(\Theta_i=\{\mathbf x_i, \mathbf s_i,\mathbf q_i, \alpha_i, \mathbf c_i\}\), \(\mathbf x \in \Bbb R^3, \mathbf s\in \Bbb R^3, \mathbf q \in \Bbb R^4, \alpha\in \Bbb R, \mathbf c \in \Bbb R^3\) original gaussian splatting에서는 spherical harmonics 계수를 이용하여 색을 표현하지만 simple diffuse color를 모델링 하기 위해 간략화 → 재질 표현이 어려울 수 있다.
3D Gaussians은 random position, unit scaling, no rotation으로 initialization 한 후, SDS를 이용해 최적화 한다.
Image-to-3D#
사전학습된 Zero-1-to-3 XL을 사용했으며 image \(\tilde I^r_\text{RGB}\) 와 foreground mask \(\tilde I^r_A\) 를 입력으로 사용한다.
\[ \triangledown_\Theta\mathcal L_\text{SDS}=\Bbb E_{t,p,\epsilon} \Big[w(t)(\epsilon_\phi(I^p_\text{RGB};t,\tilde I^r_\text{RGB},\triangle p)-\epsilon)\frac{\partial I^p_\text{RGB}}{\partial\Theta} \Big] \tag 1 \]\(w(t)\)는 weighting function이고, \(\epsilon_\phi(\cdot)\) 는 사전학습된 \(\phi\)를 이용해 예측된 noise를 뜻한다. \(\triangle p\) 는 relative camera pose, \(r\)은 reference camera이다.
추가적으로 reference view와 transparency 를 input에 align했다.
\[ \mathcal L_\text{Ref}=\lambda_\text{RGB}\|I^r_\text{RGB}-\tilde I_\text{RGB}^r \|^2_2 + \lambda_A\|I^r_A-\tilde I^r_A\|^2_2 \tag 2 \]
Text-to-3D#
Stable diffusion을 활용하여 text-to-3D task를 수행했다.
\(e\)는 주어진 text prompt의 CLIP embedding을 의미한다.
Discussion#
하지만 논문의 저자들은 SDS loss의 ambiguity 때문에 길게 학습하더라도 생성된 3D gaussians이 blurry하고 디테일이 부족하다고 한다. 이를 개선하기 위해 다음 단계인 mesh extraction과 texture refinement를 수행한다.
3.2 Efficient Mesh Extraction#
block-wise local density query와 back-projected color를 이용해 textured mesh를 추출하는 효과적인 알고리즘을 제안한다.
Local Density Query#
marching cube algorithm을 적용하기 위해서는 local density grid가 필요하다. gaussian splatting 알고리즘의 주요 특징은 over-sized Gaussian 들은 최적화 과정에서 split 및 pruning된다는 점이다. 이는 효과적인 rasterization을 위해 culling technique을 적용 할 수 있는 근거가 된다. 또한 이 점은 block-wise density queries를 perform 할 때도 사용할 수 있다.
먼저 3D space를 \((-1,1)^3\) 으로 맵핑한다. (그냥 최대, 최소값을 이용해 정규화) 그리고 이 공간을 \(16^3\)의 overlapping blocks(multiscale voxels)으로 나눈다. 그리고 각 블록의 외부에 위치한 gaussian들은 제외한다. 이를 통해 계산해야 할 gaussian의 총 개수를 효과적으로 줄일 수 있다. 그리고 각 블록의 내부에 \(8^3\) dense grid를 만들어 최종적으로는 \(128^3\)의 dense grid를 만든다. grid position \(\mathbf x\)의 각 query는 남아있는 3D gaussian들의 opacity의 weighted sum으로 local density grid를 얻는다.
\(\Sigma\)는 covariance matrix로 scaling \(\mathbf s\), rotation \(\mathbf q\)로 이루어져 있다. 이후에는 empirical threshold를 marching cube 알고리즘에 적용하여 mesh surface를 추출한다. decimation과 remeshing을 이용해 후처리하여 더욱 자연스럽고(smoother), 간결한(compact) mesh를 만들었다.
Color Back-projection#
앞선 단계에서 mesh를 얻었기 때문에 rendered RGB 이미지를 mesh surface로 back-project하여 texture map으로 만들 수 있다.
UV mapping from wikipedia
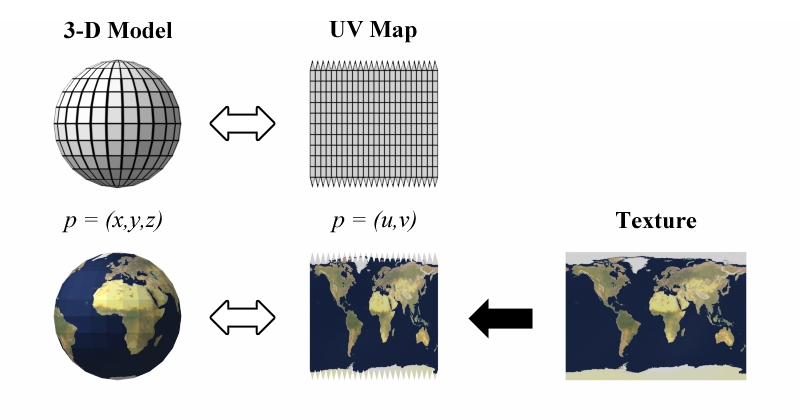
Fig. 795 uv mapping#
먼저 mesh의 UV coordinate를 unwrap하고 빈 texture image로 초기화 한다. 그리고 8개의 azimuth, 3개의 elevation을 균일하게 선택하고 top, bottom view까지 포함하여 corresponding RGB image를 렌더링 할 수 있게 한다. 이러한 RGB 이미지들의 각 픽셀은 UV coordinate를 기반으로 texture image로 맵핑할 수 있다.
이렇게 back-project된 texture image는 다음의 texture fine-tuning 단계의 초기 설정으로 사용된다.
3.3 UV-space Texture Refinement#
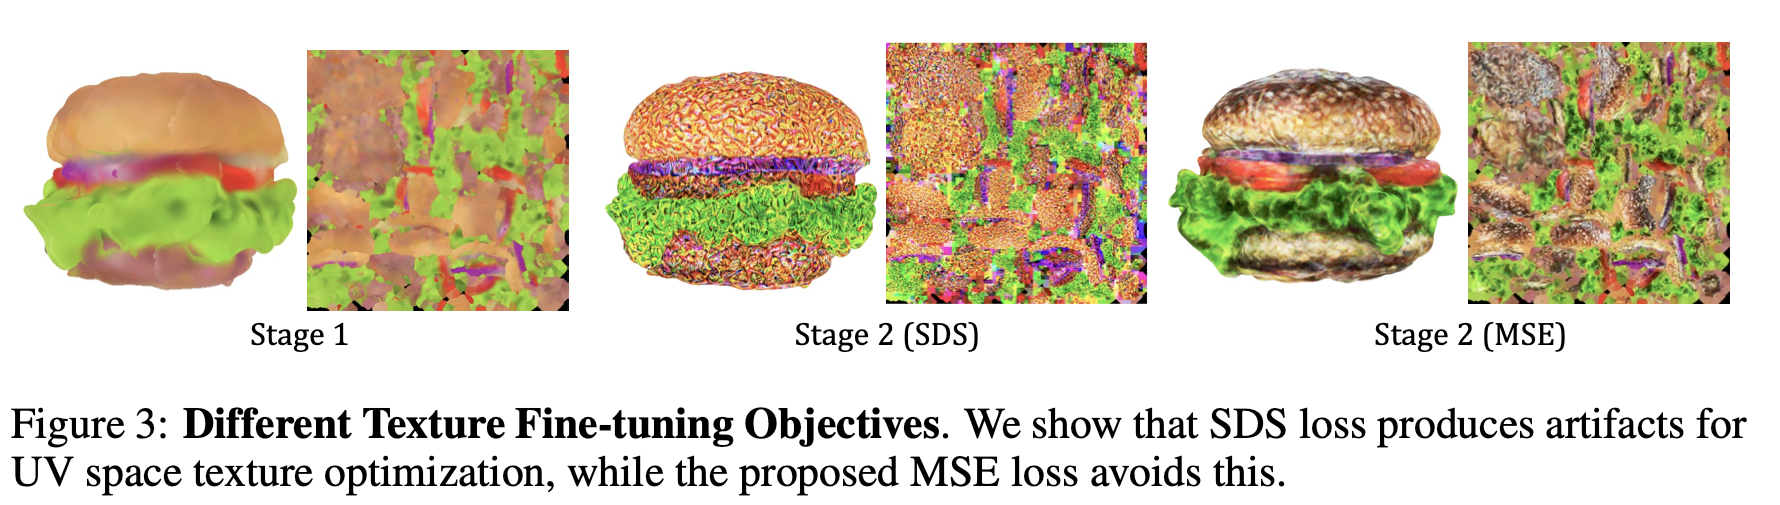
Fig. 796 UV-space Texture Refinement#
앞선 back-projection된 coarse texture를 시작으로 texture 품질을 올리고자 했으나, SDS loss를 이용해 UV-space를 직접 fine-tuning 하면 위의 그림과 같은 artifact가 발생하게된다. 이는 differentiable rasterization시 사용되는 mipmap texture sampling 기법때문이다. SDS와 같이 모호한 guidance를 이용하면 각 mipmap level에 따라 over-saturation된 color block으로 gradient가 전파 된다.
mipmap in rasterization
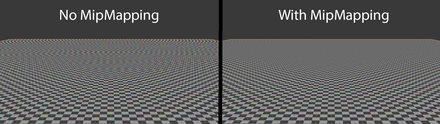
Fig. 797 from widipedia#
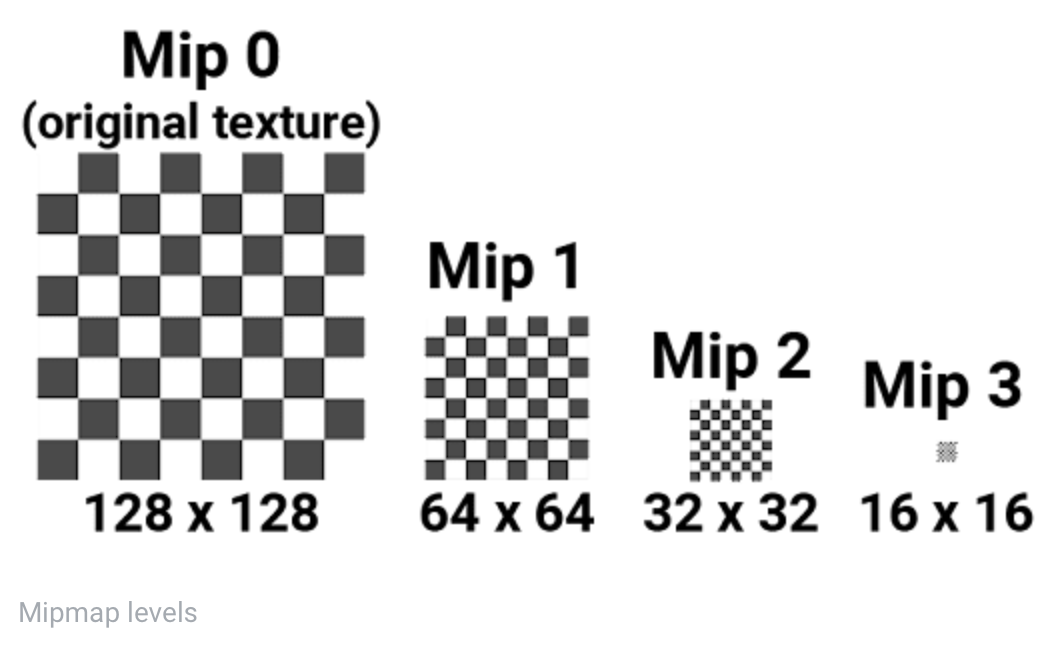
Fig. 798 from unity document#
위와 같은 고품질 렌더링와 렌더링 속도 향상을 위해 mipmap이라는 기법을 활용한다. 본 논문에서 texture mapping, rendering시 사용한 NVdiffrast도 mipmap을 활용하고 있다. mipmap은 texture를 여러 레벨의 화질으로 저장하는 방식으로 mipmap level은 특정 화질의 texture version을 의미한다. 카메라로 부터 멀리 떨어진 object는 저레벨의 mipmap을 사용해 렌더링 한다. 저레벨의 mipmap은 이미 정보손실이 일어난 상태이고 이를 이용해 렌더링 되었다면 gradient가 흐르는 방향이 왜곡 될수 있다.
stage 2 의 학습은 image-to-image synthesis와 같은 방식으로 진행된다. initialization texture가 있으므로 임의의 camera view \(p\) \(p\)
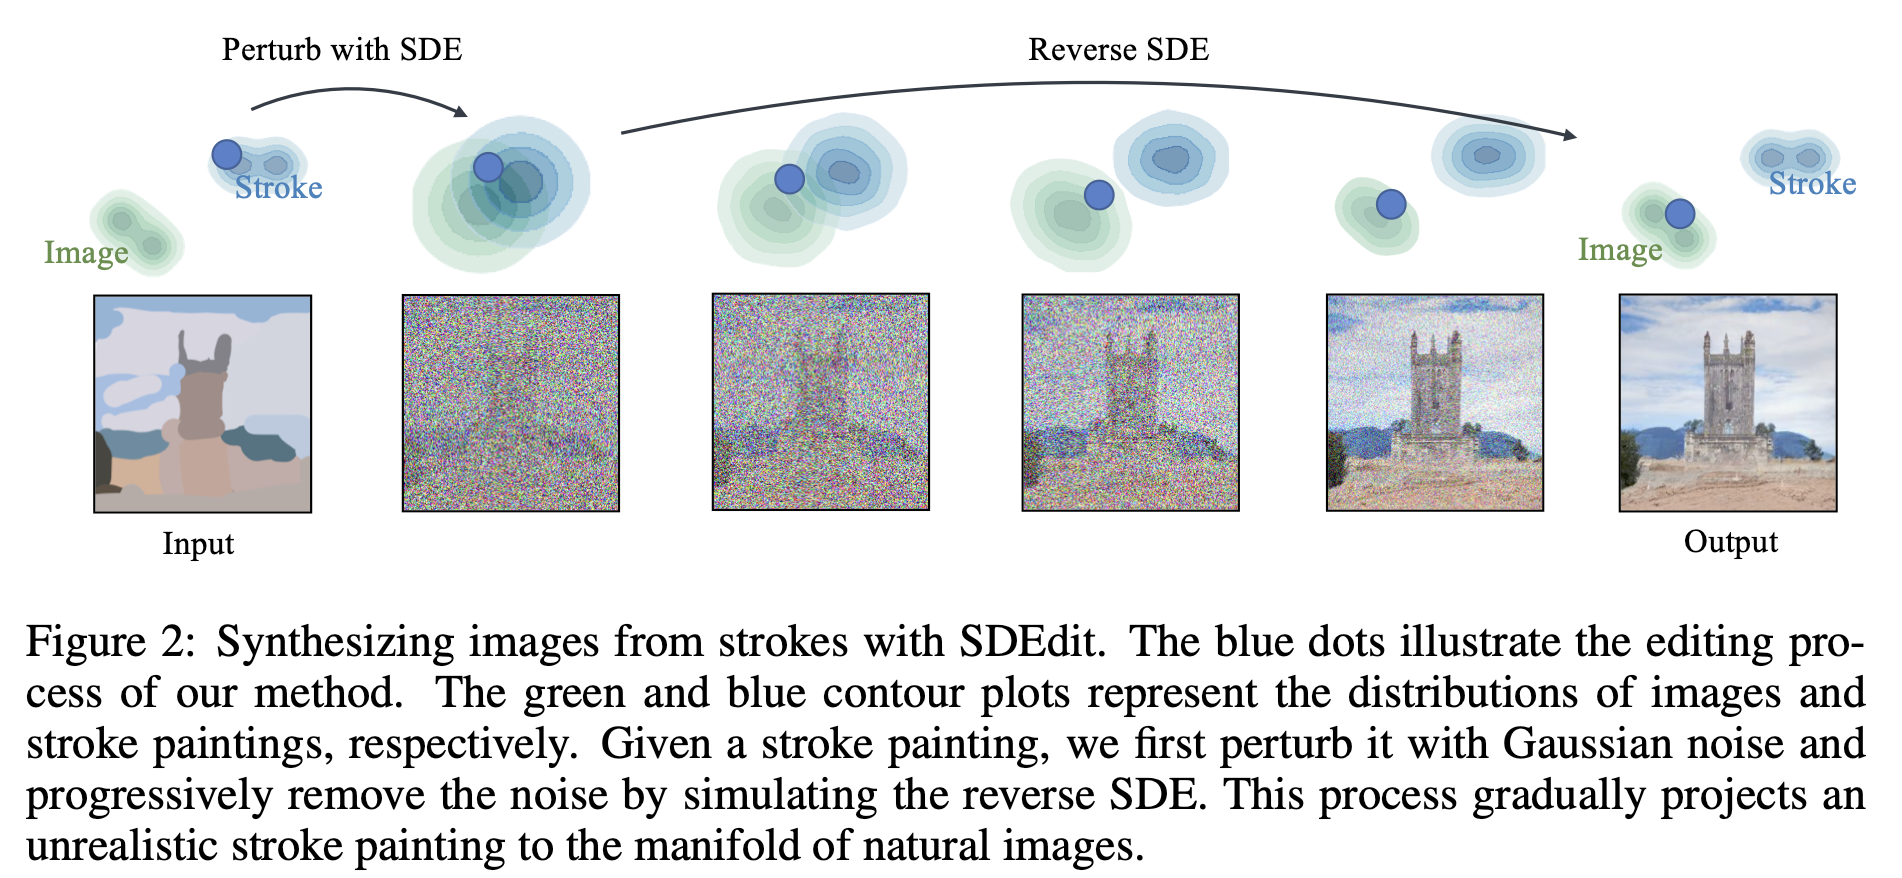
Fig. 799 from SDEdit#
\(f_\phi(\cdot)\) 는 사전학습된 2D diffusion 을 통해 refined image를 얻는 multi-step denoising process를 의미한다. \(\epsilon(t_\text{start})\) 는 timestep \(t_\text{start}\)의 랜덤 노이즈를 말한다. \(c\) 는 image-to-3D를 위한 condition인 카메라 포즈 변화량 \(\Delta p\) 이고, \(e\)는 text-to-3D의 condition을 말한다. 시작 timestep \(t_\text{start}\)는 noise 강도를 제한하기 위해 신중히 선택되어야 refined image의 original content를 유지하며 detail을 향상 시킬수 있다고 한다. refined image는 이후 pixel-wise MSE loss에 texture 최적화를 위해 사용된다.
image-to-3D task에서는 reference view RGBA loss \(\mathcal L_\text{Ref}\) 를 적용했다.
실험 결과에 따르면 50 step 정도 만에 대부분 detail이 좋아졌다고 하며 반복횟수를 늘릴수록 texture의 detail이 향상되었다고 합니다.
4. Experiments#
4.1 Implementation Details#
Number of iterations
first stage - 500 steps
second stage - 50 steps
3D Gaussian initialization
number - 5000 for image-to-3D, 1000 for text-to-3D
opacity - 0.1
color - grey
radius - 0.5
Rendering resolution - 64 to 512 for gaussian splatting, 128 to 1024 for mesh
Loss weights in eq(2) - RGB, transperency 가중치(\(\lambda_\text{RGB}, \lambda_A\))는 0에서 부터 각각 10000, 1000로 linearly increasing
Camera pose sampling - fixed radius 2 for image-to-3D / 2.5 for text-to-3D, y-axis FOV 49 degree, azimuth in \([-180,180]\) degree, elevation in \([-30,30]\).
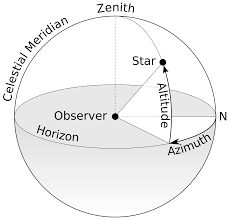
Fig. 800 Horizontal coordinates from wikipedia#
Background color - white or black randomly for gaussian splatting
Run-time - 1min/stage for image-to-3D 2min/stage for text-to-3D w. Stable Diffusion \(512\times512\) resolution
Marching cube threshold - 1
GPU - NVIDIA V100(16GB), less than 8GB for this experiments
4.2 Qualitative Comparison#
Image-to-3D comparison
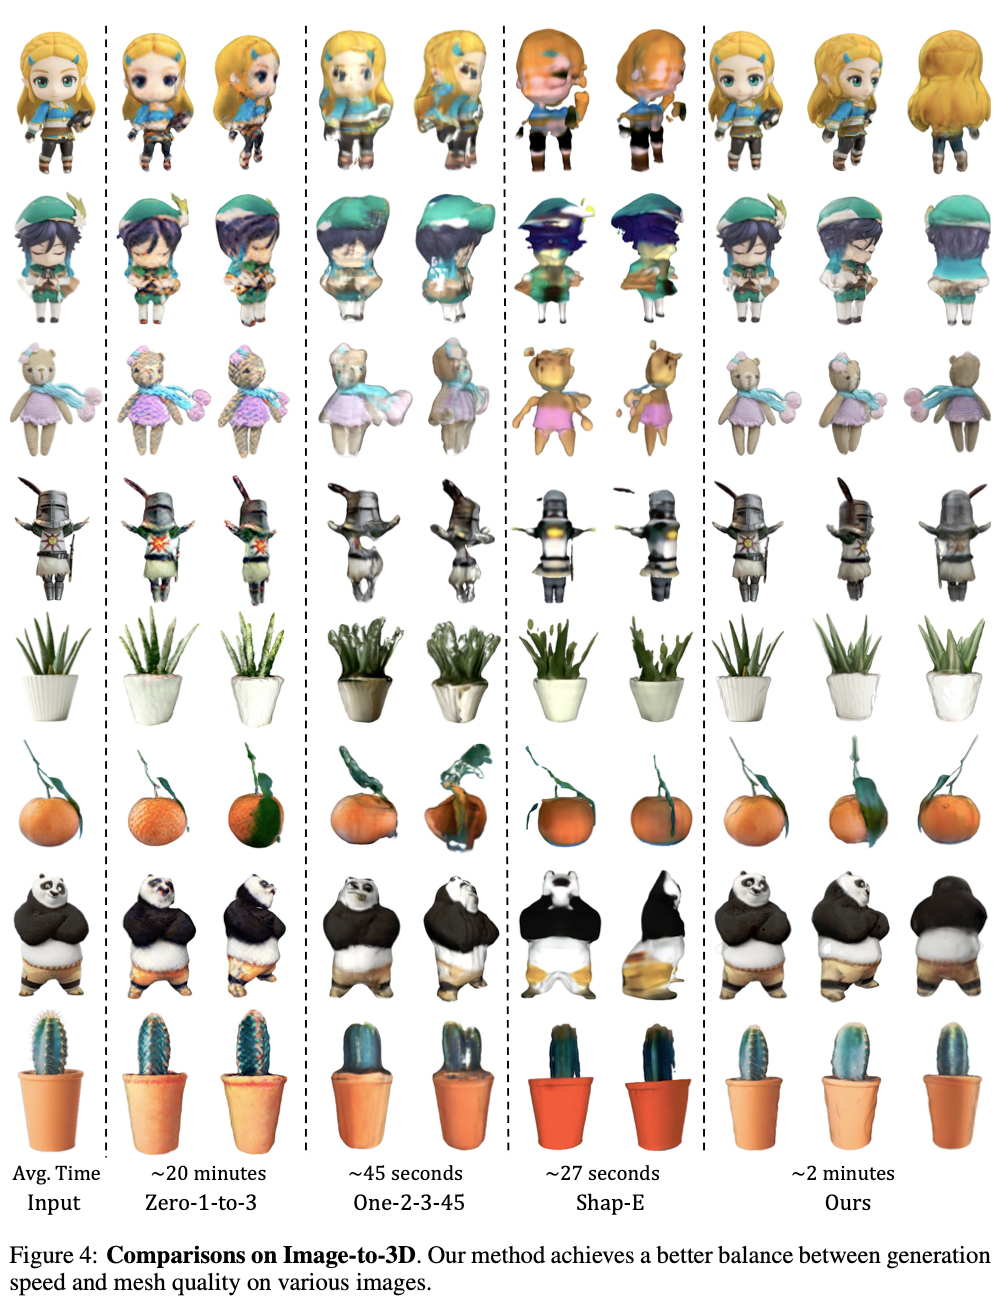
Fig. 802 실험결과#
Text-to-3D comparison
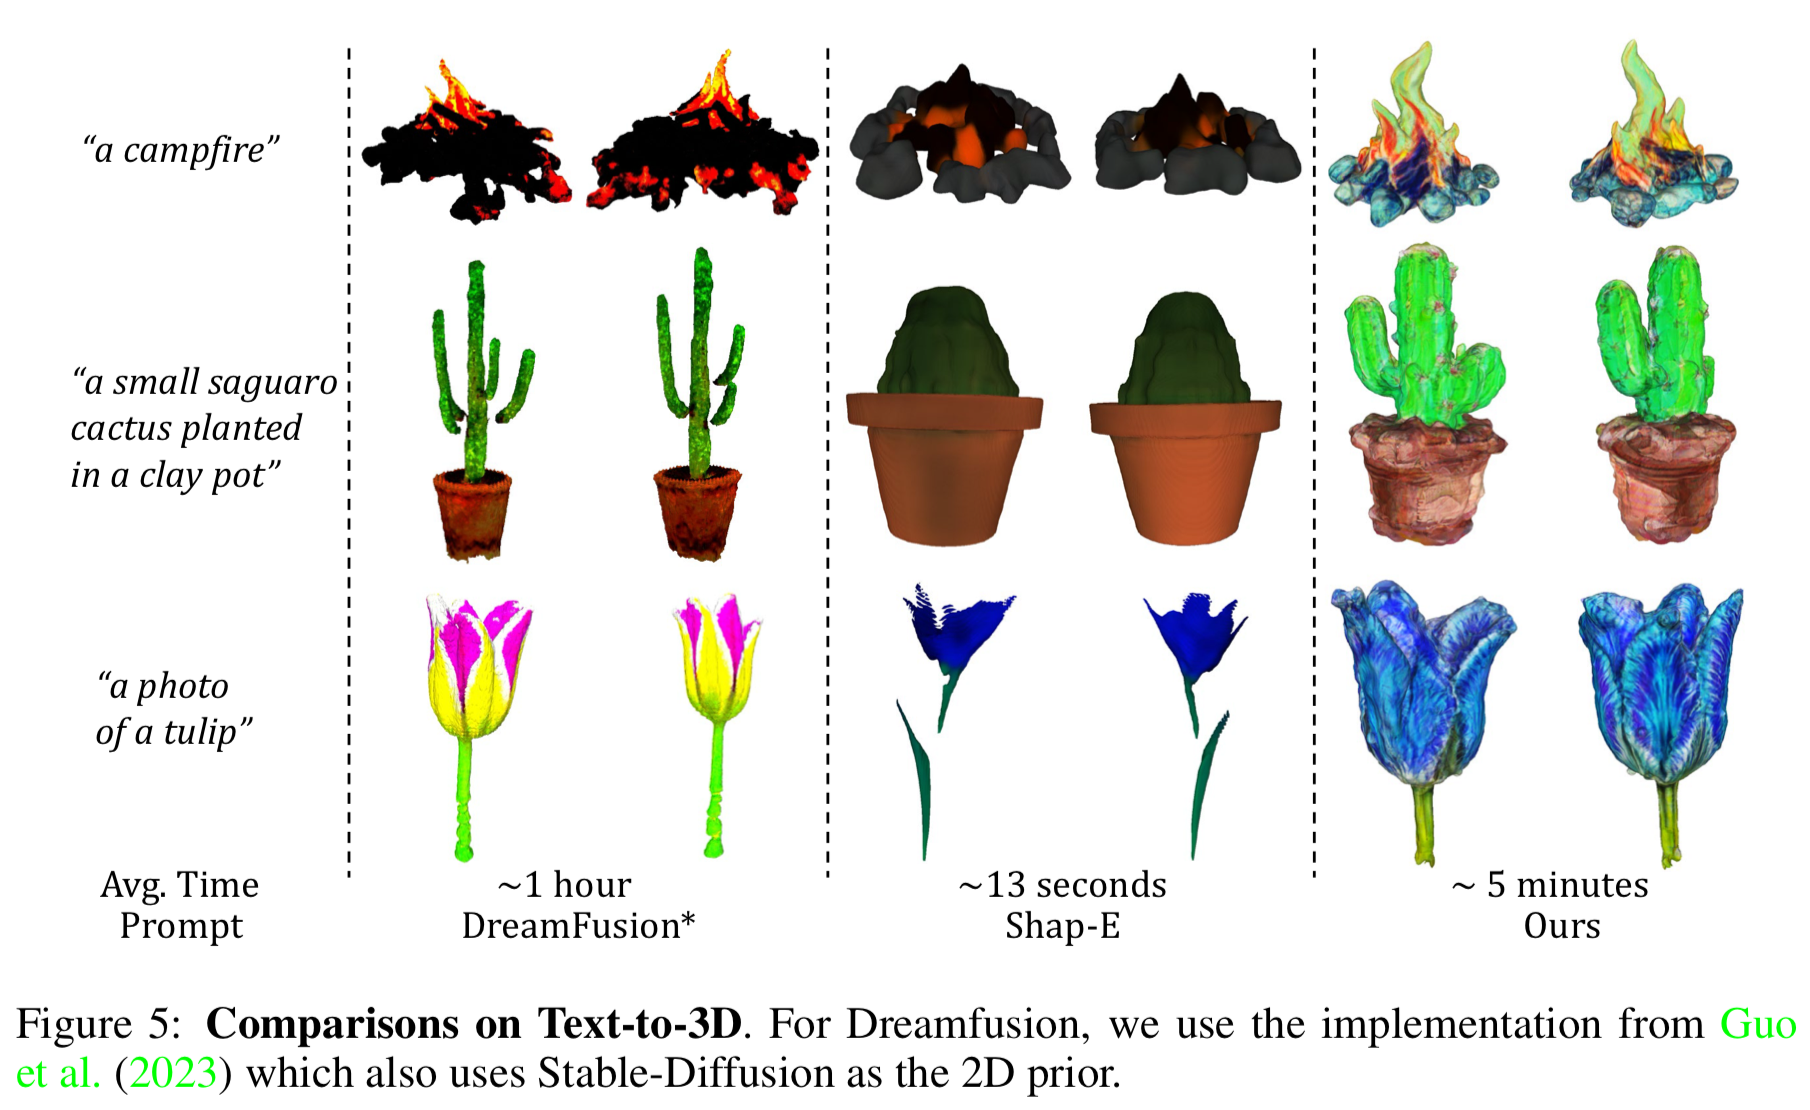
Fig. 803 실험결과#
최적화를 진행하는 방법론 뿐만 아니라 inference-only 방법론들과 비교해도 매우 빠른 생성 속도를 보였다고 함.
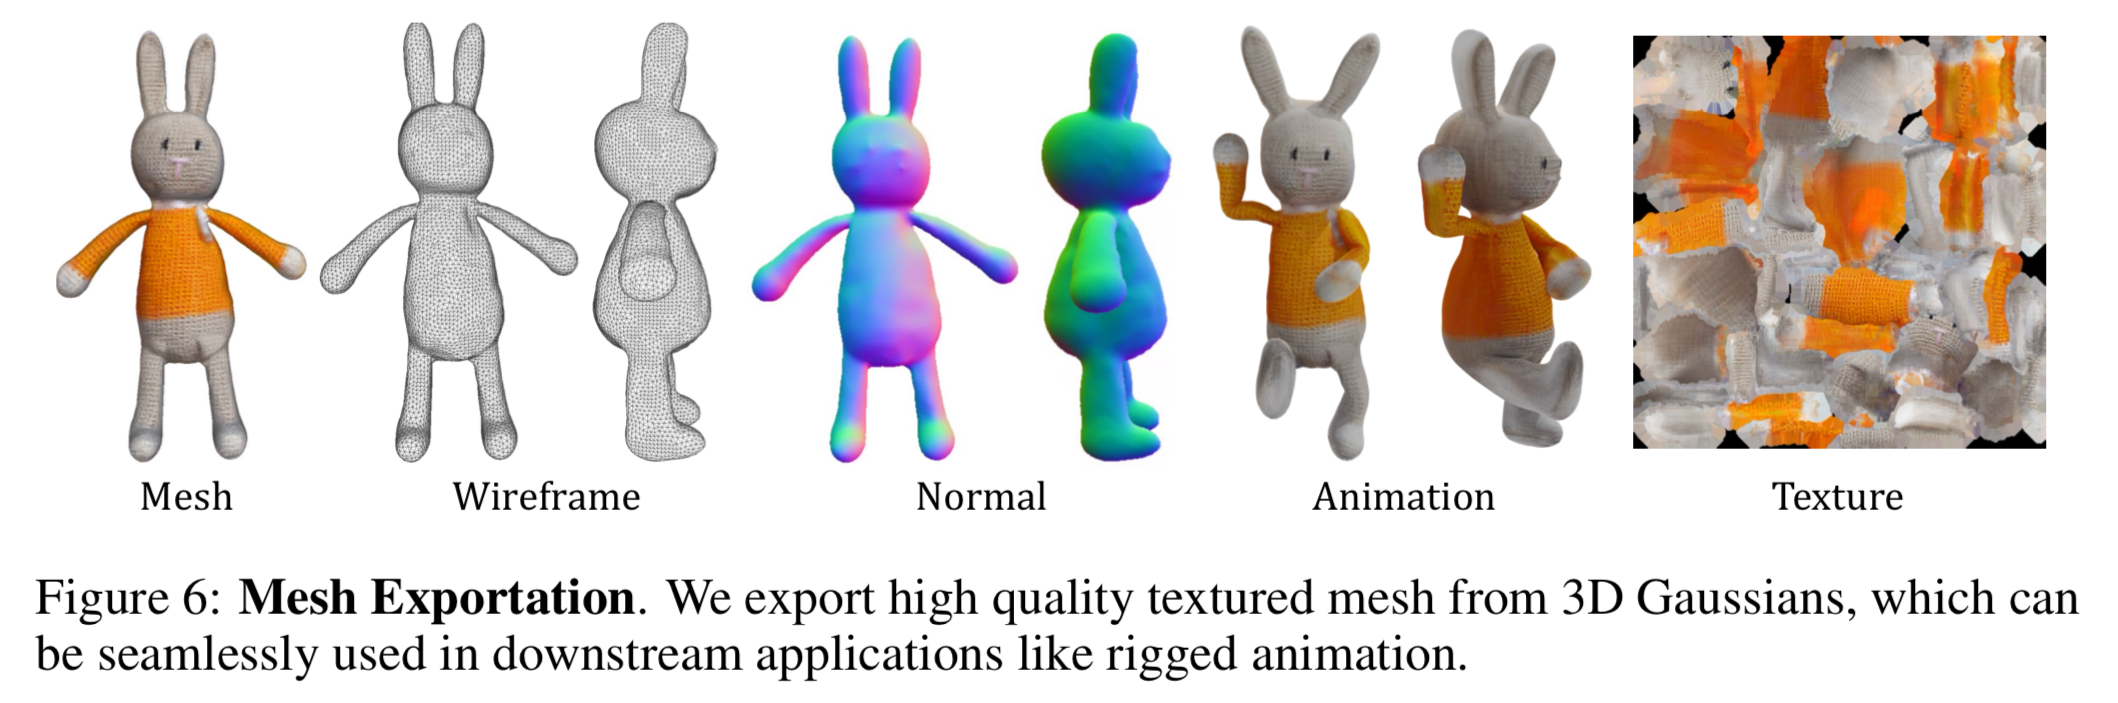
Fig. 804 실험결과#
이렇게 뽑아낸 mesh는 blender와 같은 리깅 툴을 이용해 애니메이팅 가능.
4.3 Quantitative Comparison#
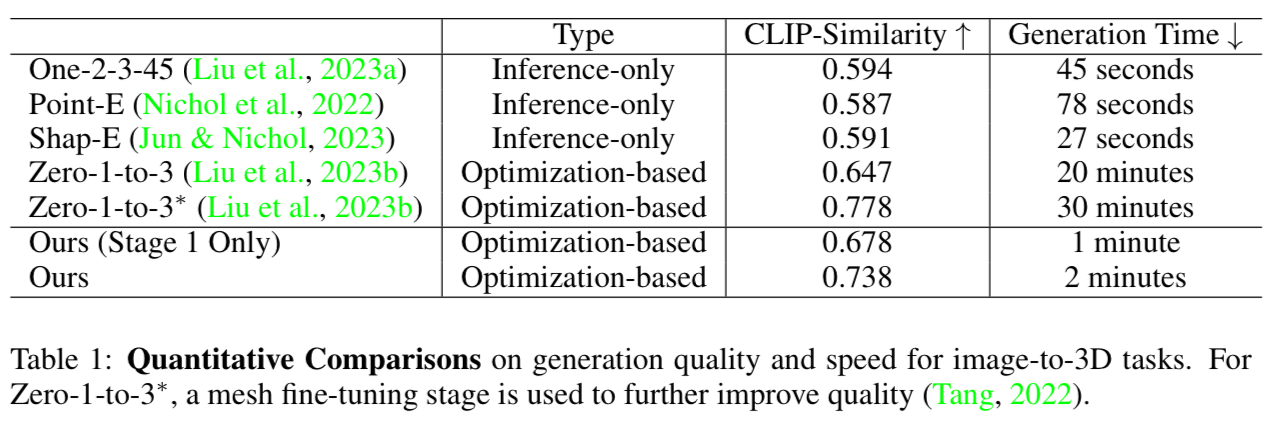
Fig. 805 실험결과#

Fig. 806 실험결과#
4.4 Ablation Study#
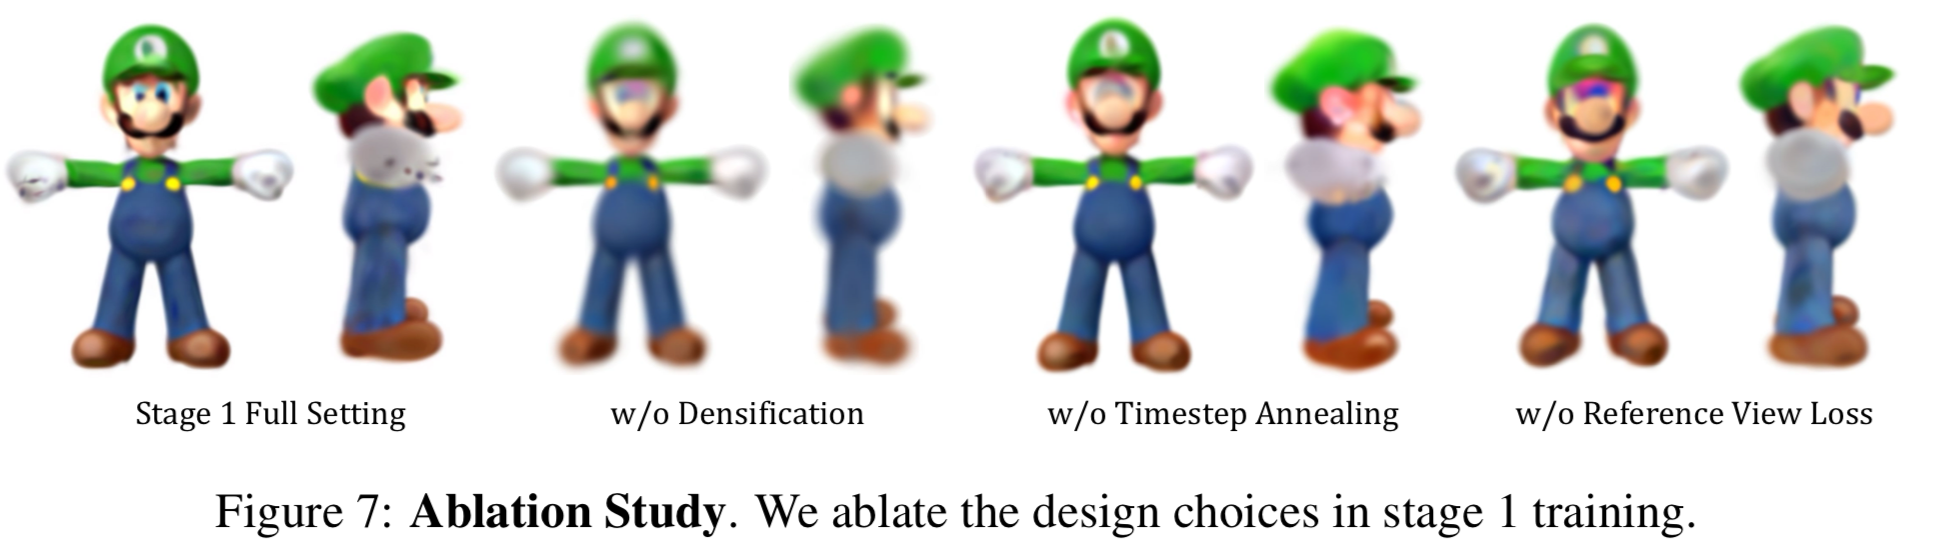
Fig. 807 실험결과#
논문에서 제안하는 파이프라인의 모든 과정이 필요함을 보여줌.
Periodical densificaiton of 3D Gaussians
Linear annealing of timestep t for SDS loss
Effect of the reference view loss \(\mathcal L_{\text{Ref}}\)
5. Limitations and Conclusion#
3D content generation framework인 DreamGaussian을 통해 3D content 생성을 효율성을 증대.
3D Gaussian으로 부터 mesh를 추출하는 알고리즘 제안.
texture fine-tuning stage를 통해 image나 text로 부터 고품질의 polygonal mesh생성 가능.
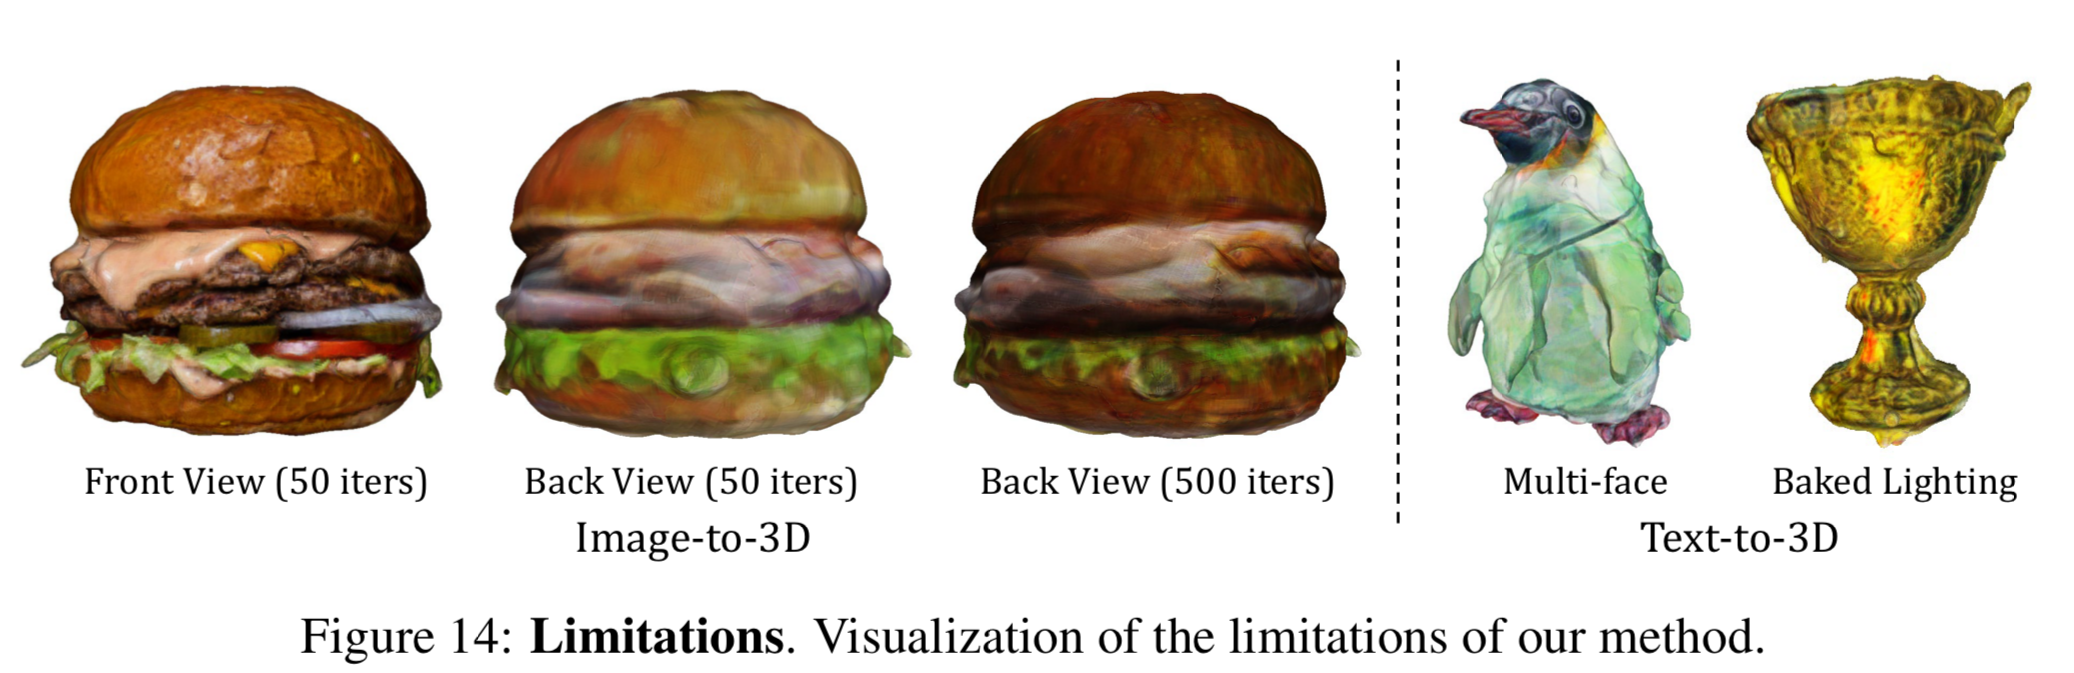
Fig. 808 실험결과#
아래와 같은 기존 방법론들의 문제점들을 여전히 가지고 있으나 score debiasing/ camera-conditioned 2D diffusion models/ BRDF auto-encoder와 같은 방법을 도입하면, 개선가능할 것으로 기대함.
Janus prob
over saturated texture
baked lighting
덧붙여 texture refinement를 진행하는 stage 2에서 blurry한 결과를 얻을 수 있으나 학습을 더 진행하면 개선된다고 함.