Information
Title: DreamBooth: Fine Tuning Text-to-Image Diffusion Models for Subject-Driven Generation (CVPR 2023)
Reference
Code: huggingface/diffusers
Author: Sangwoo Jo
Last updated on May. 31, 2023
DreamBooth#
Introduction#
최근에 DALL-E2, Imagen, Stable Diffusion 등 다양한 text-to-image generation 모델들이 등장하였지만, 어떠한 동일한 subject 에 대해서 다른 context 에 적용하는 부분에서 부족한 면들을 보여주고 있습니다. DreamBooth 논문은 이러한 문제점을 개선하기 위해 text-to-image 모델을 fine-tuning 하는 기법으로 소개되었고, 단 3-5장의 이미지를 학습하면 되며 이를 NVIDIA A100 으로 학습하는데 5분 정도밖에 소요되지 않는다고 합니다.
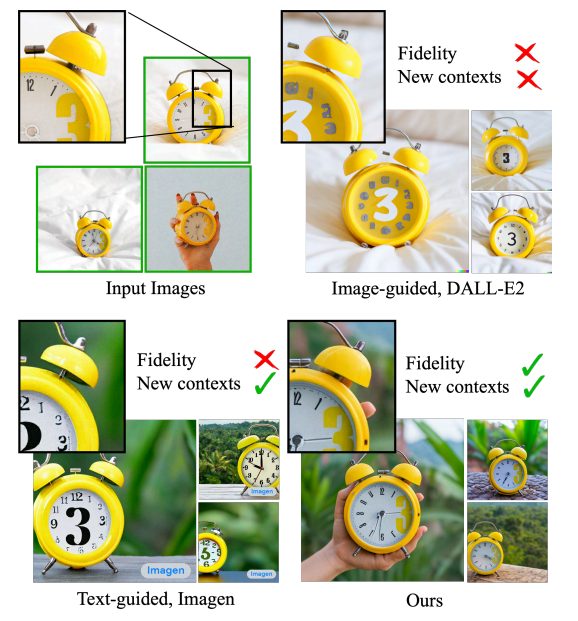
Fig. 131 Subject-Driven Generation#
DreamBooth 가 무엇인지 자세히 알아보기 전에 text-to-image diffusion model 에 대해 다시 한번 개념 정리를 해볼 필요가 있습니다.
Text-to-Image Diffusion Models#
사전학습된 text-to-image diffusion model \(\hat{x}_{\theta}\) 는 input 으로 원본 이미지 \(x\), 그리고 text prompt \(P\) 와 text-encoder \(\Gamma\) 로부터 나오는 conditioning vector \(c = \Gamma(P)\) 를 입력받아서 이미지 \(x_{gen} = \hat{x}_{\theta}(\epsilon, c)\) 를 생성하게 됩니다. 학습 시, mean squared loss 를 사용하고 이를 수식적으로 표현하면 다음과 같습니다.
이때, DreamBooth 에서는 text encoder 를 CLIP text embedding 과 사전학습된 T5-XXL 모델 중 T5-XXL 모델을 사용했다고 합니다. 그리고 DreamBooth 로 fine-tuning 할때, diffusion process 에서 사용되는 U-net (때로는 text encoder 도 포함) 은 learnable 한 parameter 로 설정하고 생성된 latent vector 로부터 새로운 이미지를 생성하는 Decoder 의 파라미터 값은 고정시킨다고 합니다.
앞써 설명드렸던 내용들을 해당 implementation code 에서 확인할 수 있습니다.
code
# https://github.com/huggingface/diffusers/blob/main/examples/dreambooth/train_dreambooth.py
text_encoder_cls = import_model_class_from_model_name_or_path(args.pretrained_model_name_or_path, args.revision)

# Load scheduler and models
noise_scheduler = DDPMScheduler.from_pretrained(args.pretrained_model_name_or_path, subfolder="scheduler")
text_encoder = text_encoder_cls.from_pretrained(
    args.pretrained_model_name_or_path, subfolder="text_encoder", revision=args.revision
)
vae = AutoencoderKL.from_pretrained(args.pretrained_model_name_or_path, subfolder="vae", revision=args.revision)
unet = UNet2DConditionModel.from_pretrained(
    args.pretrained_model_name_or_path, subfolder="unet", revision=args.revision
)
training code
# https://github.com/huggingface/diffusers/blob/main/examples/dreambooth/train_dreambooth.py
for epoch in range(first_epoch, args.num_train_epochs):
        unet.train()
        if args.train_text_encoder:
            text_encoder.train()
        for step, batch in enumerate(train_dataloader):
            # Skip steps until we reach the resumed step
            if args.resume_from_checkpoint and epoch == first_epoch and step < resume_step:
                if step % args.gradient_accumulation_steps == 0:
                    progress_bar.update(1)
                continue

            with accelerator.accumulate(unet):
                # Convert images to latent space
                latents = vae.encode(batch["pixel_values"].to(dtype=weight_dtype)).latent_dist.sample()
                latents = latents * vae.config.scaling_factor

                # Sample noise that we'll add to the latents
                if args.offset_noise:
                    noise = torch.randn_like(latents) + 0.1 * torch.randn(
                        latents.shape[0], latents.shape[1], 1, 1, device=latents.device
                    )
                else:
                    noise = torch.randn_like(latents)
                bsz = latents.shape[0]
                # Sample a random timestep for each image
                timesteps = torch.randint(0, noise_scheduler.config.num_train_timesteps, (bsz,), device=latents.device)
                timesteps = timesteps.long()

                # Add noise to the latents according to the noise magnitude at each timestep
                # (this is the forward diffusion process)
                noisy_latents = noise_scheduler.add_noise(latents, noise, timesteps)

                # Get the text embedding for conditioning
                encoder_hidden_states = text_encoder(batch["input_ids"])[0]

                # Predict the noise residual
                model_pred = unet(noisy_latents, timesteps, encoder_hidden_states).sample

                # Get the target for loss depending on the prediction type
                if noise_scheduler.config.prediction_type == "epsilon":
                    target = noise
                elif noise_scheduler.config.prediction_type == "v_prediction":
                    target = noise_scheduler.get_velocity(latents, noise, timesteps)
                else:
                    raise ValueError(f"Unknown prediction type {noise_scheduler.config.prediction_type}")

                if args.with_prior_preservation:
                    # Chunk the noise and model_pred into two parts and compute the loss on each part separately.
                    model_pred, model_pred_prior = torch.chunk(model_pred, 2, dim=0)
                    target, target_prior = torch.chunk(target, 2, dim=0)

                    # Compute instance loss
                    loss = F.mse_loss(model_pred.float(), target.float(), reduction="mean")

                    # Compute prior loss
                    prior_loss = F.mse_loss(model_pred_prior.float(), target_prior.float(), reduction="mean")

                    # Add the prior loss to the instance loss.
                    loss = loss + args.prior_loss_weight * prior_loss
                else:
                    loss = F.mse_loss(model_pred.float(), target.float(), reduction="mean")

                accelerator.backward(loss)
                if accelerator.sync_gradients:
                    params_to_clip = (
                        itertools.chain(unet.parameters(), text_encoder.parameters())
                        if args.train_text_encoder
                        else unet.parameters()
                    )
                    accelerator.clip_grad_norm_(params_to_clip, args.max_grad_norm)
                optimizer.step()
                lr_scheduler.step()
                optimizer.zero_grad(set_to_none=args.set_grads_to_none)
Fine-tuning#
DreamBooth 에서 pre-trained 된 text-to-image generation 모델을 fine-tuning 할 때 “a [unique identifier] [class noun]” 그리고 “a [class noun]” 형태의 두 가지 text prompt 를 사용합니다. 이때, unique identifier 에 유지하고자 하는 대상에 대한 정보를 담는 것을 목표로 하기 때문에 사전 정보가 없는 rare token 을 사용하는 것이 중요하다고 합니다. 논문에서는 3개 이하의 Unicode character 혹은 T5-XXL tokenizer 를 랜덤하게 샘플링해서 token 을 생성하고 이를 기반으로 unique identifier 를 정의합니다.
또한, 논문에서 Language Drift 그리고 Reduced Output Diversity 두 가지 문제점을 해결하기 위해 Class-specific Prior Preservation Loss 를 소개합니다. 이를 활용하여 모델을 fine-tuning 하는 방법은 다음과 같습니다.
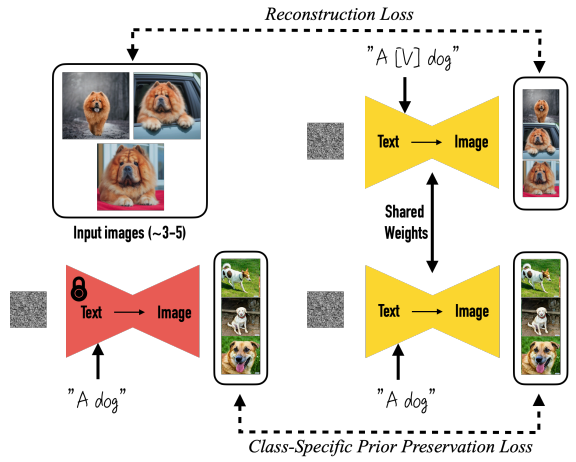
Fig. 132 Fine-tuning#
우선, Gaussian 노이즈 이미지와 “A V [class noun]” 형태의 text prompt 를 사전학습된 text-to-image diffusion 모델에 입력하여 이미지를 생성한 후, 원본 이미지와의 Reconstruction Loss 를 계산합니다. 그리고 비슷한 과정으로 Gaussian 노이즈 이미지와 “A [class noun]” 형태의 text prompt 를 학습하고자 하는 모델, 그리고 freeze 시킨 또 다른 pre-trained diffusion 모델에 각각 입력하여 이미지를 생성한 후 Class-Specific Prior Preservation Loss 를 계산합니다. 이에 대한 training objective 를 수식적으로 표현하면 다음과 같습니다.
Class-Specific Prior Preservation Loss 를 추가함으로써 class prior 에 대한 정보를 유지하게 되고, 이로써 동일한 class 에 대해 더 다양한 이미지들을 생성할 수 있는 부분을 아래 그림에서 확인할 수 있습니다.
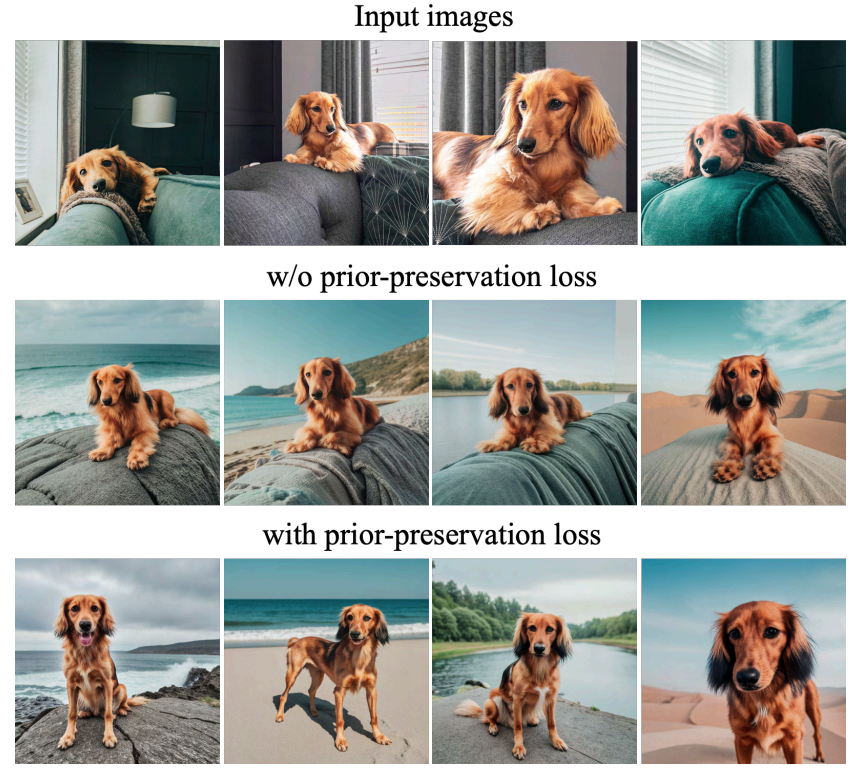
Fig. 133 Encouraging diversity with prior-preservation loss#
Experiments#
DreamBooth 논문에서 세 가지의 모델 평가 metric 을 소개합니다. 첫번째로는 subject fidelity 를 측정하는 CLIP-I, DINO 그리고 prompt fidelity 를 측정하는 CLIP-T metric 을 사용합니다. 이때, DINO metric 이 동일한 class 를 가진 subject 에 대해서 다른 embedding 이 생성되기 때문에 CLIP-I 보다 더 선호된다고 합니다. 더 자세하게는 각 metric 은 다음과 같이 계산됩니다.
CLIP-I := 생성된 이미지와 실제 이미지의 CLIP embedding 의 평균 pairwise cosine similarity
DINO := 생성된 이미지와 실제 이미지의 ViT-S/16 DINO embedding 의 평균 pairwise cosine similarity
CLIP-T := 입력 prompt 와 생성된 이미지의 CLIP embedding 의 평균 pairwise cosine similarity
Textual Inversion 과 비교했을때, 세 개의 metric 에서 모두 DreamBooth 가 더 좋은 성능을 보여주는 것을 확인할 수 있습니다.

Fig. 134 Comparison of models#
Ablation Studies#
Prior Preservation Loss (PPL) 과 Class-Prior 에 대한 Ablation Studies 결과도 논문에서 공유합니다. PPL 가 적용됨으로써 앞써 소개드렸던 Language Drift 그리고 Reduced Output Diversity 문제점을 PRES 그리고 DIV metric 을 통해 해결되는 것을 보여줍니다. 또한, Class-Prior Ablation 에서 다음과 같은 세 가지 prompt 를 사용하여 fine-tuning 했을 때, 해당 subject 에 맞는 class noun 을 prompt 에 입력했을때가 가장 좋은 성능을 보여준다고 설명합니다.
“no class noun”
“a randomly sampled incorrect class noun” (e.g., “can” for a backpack)
“correct class noun”
Applications#
논문에서 DreamBooth 를 활용한 여러 application 도 소개합니다.
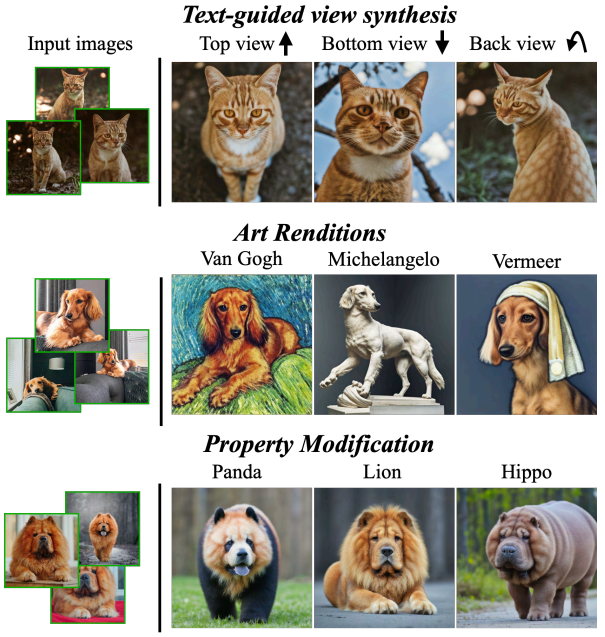
Fig. 135 Applications of DreamBooth#
Recontextualization
Prompt: “a [V] [class noun] [context description]”
다음과 같은 prompt 입력 시, 사전에 보지 못했던 새로운 pose 나 articulation 을 잘 표현하는 부분을 확인할 수 있습니다.
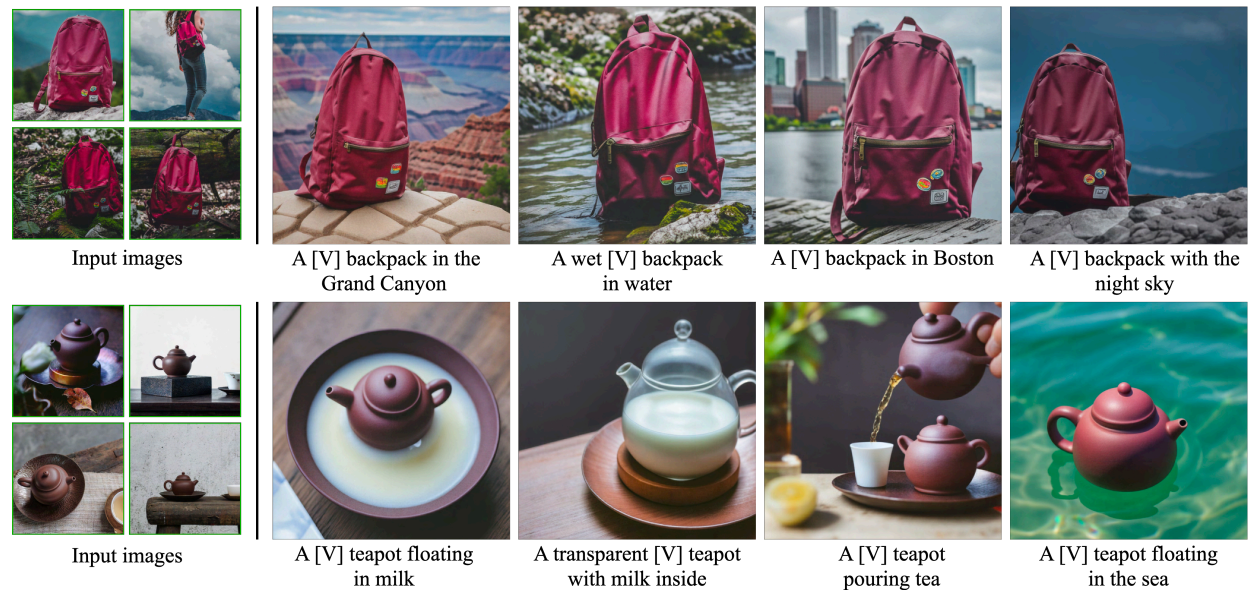
Fig. 136 Recontextualization#
Art Renditions
Prompt: “a painting of a [V] [class noun] in the style of [famous painter]” or “a statue of a [V] [class noun] in the style of [famous sculptor]”
Style Transfer 와 다르게 동일한 구조를 유지한 채 style 만 바꾸는 것이 아니라 다양한 pose 형태도 생성 가능합니다.
Novel View Synthesis
동일한 subject 에 대해 다양한 각도에서 보는 이미지 생성도 가능합니다.
Property Modification
Prompt: “a cross of a [V] dog and a [target species]”
사전 학습한 subject 의 고유 feature 들이 다른 target species 에서도 반영이 되는 부분을 확인할 수 있습니다.
Limitations#
하지만 DreamBooth 모델에 다음과 같은 한계점도 존재합니다.
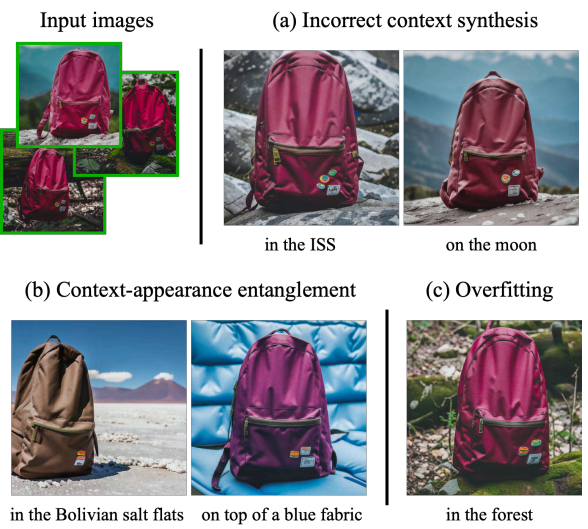
Fig. 137 Limitations of DreamBooth#
Incorrect context synthesis := 대표적으로 training set 에 자주 나타나지 않는 subject, prompt, context 에 대해서 낮은 성능을 보여줍니다.
Context-appearance entanglement := 유지하고자 하는 대상의 appearance (e.g, color) 가 prompted context 에 의해 달라지는 현상
Overfitting := 사전학습된 데이터와 유사한 prompt 입력 시, overfitting 현상 발생
마지막으로 subject 대상에 따라 모델 성능(fidelity)이 차이를 보인다고 합니다.
Appendix#
마지막으로, 논문 본문에 소개되고 있지는 않지만 Appendix 부문에서도 흥미로운 결과들을 확인할 수 있습니다. Figure 20 은 fine tuning 하는 이미지 개수에 따른 DreamBooth 학습결과를 보여주는데, 단 한 장만으로도 identity 의 전반적인 특징을 잘 담는 것을 확인할 수 있습니다. Figure 18 은 만화 캐릭터의 identity 를 유지한 상태로 다양한 만화 사진들을 모델이 생성하는 사례들을 보여줍니다.
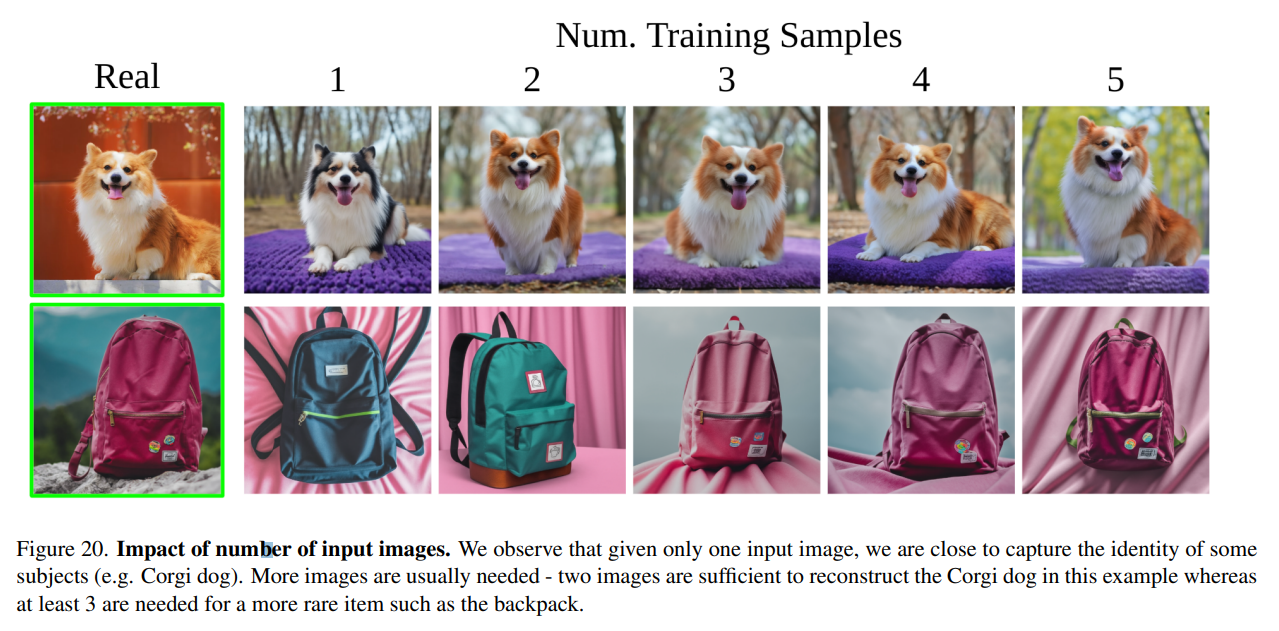
Fig. 138 Appendix-1#
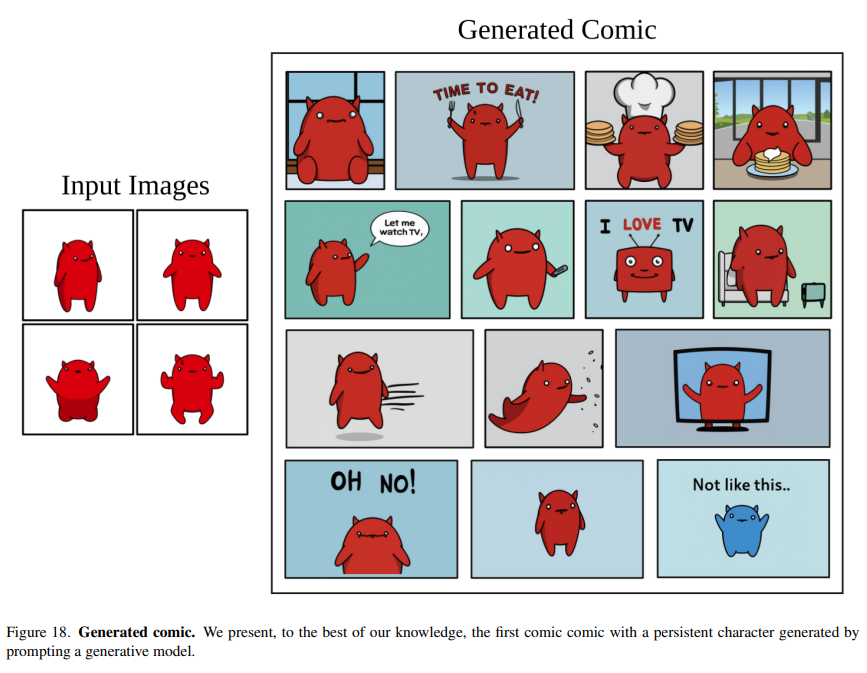
Fig. 139 Appendix-2#
